15 July 2015

Whitespace report

With the help from Paul Cunningham's tutorial on how to send HTML formatted email with powershell, i threw together this small script to quickly get an overview of the available new mailbox database space, also know as "whitespace".

$Date = Get-Date
$smtpServer = "smtp.domain.lan"
$smtpFrom = "WhiteSpace@domain.nl"
$smtpTo = "receipient@domain.nl"
$messageSubject = "WhiteSpace report for $Date"

$message = New-Object System.Net.Mail.MailMessage $smtpfrom, $smtpto
$message.Subject = $messageSubject
$message.IsBodyHTML = $true

$a = "<style>"
$a = $a + "BODY{font-family: Arial; font-size: 10pt;}"
$a = $a + "TABLE{border: 1px solid black; border-collapse: collapse;}"
$a = $a + "TH{border: 1px solid black; background: #dddddd; padding: 5px;}"
$a = $a + "TD{border: 1px solid black; padding: 5px;}"
$a = $a + "</style>"

$message.Body = Get-MailboxDatabase -Status | sort name | select name,@{Name='DB Size (Gb)';Expression={$_.DatabaseSize.ToGb()}},@{Name='Available New Mbx Space Gb)';Expression={$_.AvailableNewMailboxSpace.ToGb()}} | ConvertTo-Html -Head $a

$smtp = New-Object Net.Mail.SmtpClient($smtpServer)
$smtp.Send($message)

The result looks like this:

Run from the Task scheduler with this line:
C:\Windows\System32\WindowsPowerShell\v1.0\powershell.exe -command ". 'C:\Program Files\Microsoft\Exchange Server\V14\Bin\RemoteExchange.ps1'; Connect-ExchangeServer -auto; 'C:\_Scripts\Exchange\WhiteSpace.ps1'"

13 July 2015

Exchange 2013 OWA blank page error 400

If you encounter this problem (bad request, http 400 error) on your Exchange 2013 infrastructure.
These are the steps that you can follow to fix it.
Note:The powershell scripts are not mentioned anywhere in the official Technet documentation.
The powershell scripts are only mentioned on several blogposts regarding Microsoft Exchange 2010.
  1. Login to your Exchange 2013 CAS server
  2. Start the Exchange Management Shell
  3. Navigate to your Exchange 2013 binaries location, for example:C:\Program Files\Microsoft\Exchange Server\V15\Bin\
  4. Execute the UpdateCas.ps1 Windows PowerShell script and wait a few moments.
    This script will rebuild your OWA interface.
  5. If you haven’t executed UpdateConfigFiles.ps1 , now is a good time. Execute it.
    It looks like you need to execute this Windows PowerShell script, after each cumulative update of Microsoft Exchange 2013 to keep everything working smooth.

Conclusion
After each installation of a cumulative update for Exchange 2013, remember to execute both the UpdateCas.ps1 and UpdateConfigFiles.ps1 Windows PowerShell scripts.
It will save you a lot of trouble, troubleshooting errors with OWA and ECP.

06 July 2015

Restart all exchange 2013 services

Need to restart all Exchange 2013 services?

Restart the "Microsoft Exchange Active Directory Topology" service and all Exchange related services will restart.


Or do the same in Powershell:

Restart-Service MSExchangeADTopology

02 July 2015

Hide your internal server names from email header

When sending email to an organization outside your lan you also send some information that you don't want to expose and even in some cases those emails are not accepted because the SPF rules state that no local domain names are accepted, as they cannot be resolved by reverse DNS checking the HELO.

One way of dealing with this issue is to remove the anonymous access right on the send connector:

Get-SendConnector “Connector Name” | Remove-ADPermission -AccessRight ExtendedRight -ExtendedRights ms-Exch-Send-Headers-Routing -user “NT AUTHORITY\Anonymous Logon”


In my opinion there's an easier way, one that can be rolled back instantly in case something goes wrong or causes errors.
Create a Transport rule that removes the "header" from all out going messages.


Open Microsoft Exchange Console
Navigate to:
Microsoft Exchange \ Organization Configuration \ Hub Transport \ Transport Rules


  • Right Click and select New Transport Rule 
  • Name it " Remove headers "Received" ” 
  • click Next
  • Choose "From users inside or outside the organization"
  • Select Inside click Next
  • Choose Remove header
  • As message header just write: "Received"
  • Click Next twice

27 June 2015

Installing Office 2016 Preview, error 0-1028 (0)

When trying to install the Office 2016 Preview, you may receive error 0-1028 (0).

To get past this error delete the following folder:
C:\Program Files\Common Files\Microsoft Shared\ClickToRun

09 June 2015

Remove the Exchange 2013 default database after installation

After installing Exchange 2013 there is always a standard/default mailbox database.
When trying to remove it, you get errors stating that there are still mailboxes on it.

Move all those mailboxes to your newly created mailbox database:

Get-Mailbox -Database “Mailbox Database 1905367170″ -Arbitration -PublicFolder -Monitoring | New-MoveRequest –TargetDatabase “Your Mailbox Database

Install Exchange with the correct Database and log files path:

For Exchange 2010:
setup /mode:install /roles:c,h,m,t /mdbname:MDB01 /DbFilePath:E:\MDB01DB\MDB01.edb /LogFolderPath:D:\MDB01LOG


For Exchange 2013:
setup /mode:install /roles:c,m -MDBDBPath C:\MailboxData\MDB1\DB -MDBLogPath C:\MailboxData\MDB1\Log -MDBName MDB1


If you're migrating from Exchange 2010 to Exchange 2013, you still get an error:

Error:
This mailbox database contains one or more mailboxes, mailbox plans, archive mailboxes, or arbitration mailboxes. To get a list of all mailboxes in this database, run the command Get-Mailbox -Database <Database ID>. To get a list of all mailbox plans in this database, run the command Get-MailboxPlan. To get a list of archive mailboxes in this database, run the command Get-Mailbox -Database <Database ID> -Archive. To get a list of all arbitration mailboxes in this database, run the command Get-Mailbox -Database <Database ID> -Arbitration. To disable a non-arbitration mailbox so that you can delete the mailbox database, run the command Disable-Mailbox <Mailbox ID>. To disable an archive mailbox so you can delete the mailbox database, run the command Disable-Mailbox <Mailbox ID> -Archive. Arbitration mailboxes should be moved to another server; to do this, run the command New-MoveRequest <parameters>. If this is the last server in the organization, run the command Disable-Mailbox <Mailbox ID> -Arbitration -DisableLastArbitrationMailboxAllowed to disable the arbitration mailbox. Mailbox plans should be moved to another server; to do this, run the command Set-MailboxPlan <MailboxPlan ID> -Database <Database ID>.

This is because the exchange setup process setup /p or /prepareAD creates these accounts.

First run the cmdlet to see that you have the Arbitration mailboxes alive:

Set-AdServerSettings -ViewEntireForest $True

This is because Arbitration mailboxes are created on the root domain by default.


Now run:


Get-Mailbox -Arbitration | Ft Name, Database

Now if you need to remove it and have another database available to home these, run the cmdlet:


Get-Mailbox -Arbitration | Set-Mailbox -Arbitration -Database “Name of the new Database”
If you want to Move Arbitration to a new mailbox store and the old store is mounted and well,

Get-Mailbox -Arbitration -Database “CurrentDatabase” | New-MoveRequest -TargetDatabase “NewDatabaseName”

Lets say the database contains mailboxes other than Arbitration and you want to move all of them to a new mailbox store and the old store is mounted and well,


Get-Mailbox -Database “CurrentDatabase” | New-MoveRequest -TargetDatabase “NewDatabaseName”

If you want to Disable Arbitration mailboxes run:


Get-Mailbox -Arbitration -Database “CurrentDatabase” | Disable-Mailbox -Arbitration
If you want to remove Arbitration mailboxes run:

Get-Mailbox -Arbitration -Database “CurrentDatabase” | Remove-Mailbox -Arbitration –RemoveLastArbitrationMailboxAllowed

Now for some reason these Arbitration mailboxes went missing, then find the version of your exchange server using the cmdlet, then download the appropriate service pack and run setup /p

GCM exsetup |%{$_.Fileversioninfo}

You may also replace the homeMDB value of the Arbitration mailbox with the DN of a mailbox database too.


To move Arbitration mailboxes from Exchange 2010 to Exchange 2013:

Get-MailboxDatabase -IncludePreExchange2013 | FL Name,Server,AdminDisplayVersion

Get-Mailbox -Arbitration | New-MoveRequest -TargetDatabase <NewDatabaseinExchange2013>

Source
Source

27 May 2015

Configure Auto Enroll for Computer & User certificates

Searching for a good and clear "how to" i came across this blogpost from Adrian Costea that sums it up in a very easy and understandable way.
Auto enrollment it self isn't hard at all, but if you're new to this it's hard to figure out where to start.

Well this is how its done:

Set Up Automatic Certificate Enrollment (Auto enroll)
Managing certificates usually does not need too much intervention. Issuing and enrolling for certificates, again is a piece-of-cake… in a small environment. But if you are running more than let’s say 50 workstations and servers enrolling for certificates is a week job, if not more. To ease the work; actually to automate this you can use Active Directory since you already have the tool in your hands. This is one of the advantages of an Active Directory domain with an Enterprise CA; you can deploy certificates automatically using a process known as auto enrollment. This greatly reduces the amount of administrative overhead required to deploy certificates to your clients; and all you need for this is a GPO linked to your domain or an OU configured with the auto enroll policy.
Before we start I presume you already have your Active Directory Certificate Service installed and at least some clients joined to the domain to be able to test this. If you don’t have enough hardware at your disposal, VMware Workstation is great way to do test labs.
In the first part of the article I’m going to talk about Computer Certificates Auto-Enrollment and in the second part about User Certificates Auto-Enrollment.
Computer Certificates Auto-Enrollment
Now log in to one of your domain controllers and open the Group Policy Management console.

Here you have to decide where the GPO should be linked. If you want only a bunch of clients to be configured for auto enrollment, create and link the GPO to the OU where those clients sit. If however, you want the policy to apply to all clients in your domain, create and link the GPO to the root of the domain.
 
To create the GPO, right-click the root of the domain or the OU and choose Create a GPO in this domain, and Link it here…. Give it a name and click OK.
     
On the newly created GPO do a right-click and choose Edit.
Once the Group Policy Management Editor opens, navigate to Computer Configuration > Policies > Windows Settings > Security Settings > Public Key Policies. Here you will see Certificates Services Client – Auto-Enrollment policy.
Open its properties and choose Enabled on the Configuration Model box, then check the boxes Renew expired certificates, update pending certificates, and remove revoked certificates and Update certificates that use certificate templates. Click OK when you are done. As you can see this policy will automatically renew any expired certificates and also cleans up the certificates store of any certificates that expired.

     
Only configuring this will not get the job done. You have to tell the clients what type of certificate they can request and this can be done by creating a Certificate Request Setting. To set it up expand the Public Keys Policies folder, right-click Automatic Certificate Request Settings and choose New > Automatic Certificate Request.
Click Next to skip the Welcome screen of the wizard.
On the Certificates Templates page you can see all the templates that you can use to issue certificates from. The only one we are interested right now is the Computer certificate. Select it and click Next and at the end click Finish to close the wizard.
    
Now you have a Certificate Request Settings created. Let’s tests it and see if it works.
Log in to one of you clients and open the certificate store from Start > Run > mmc. Once the console opens, from the File menu choose Add/Remove Snap-in.
In the Add/Remove Snap-ins window select Certificates and click the Add button.
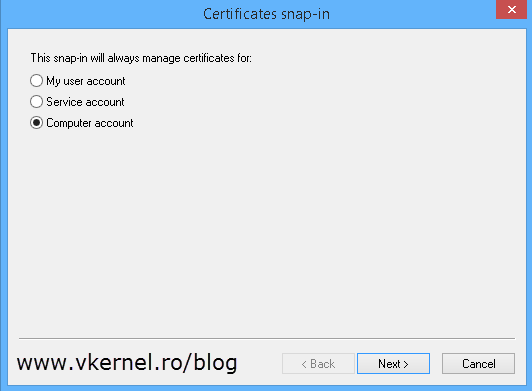
Choose Computer account > Local computer.

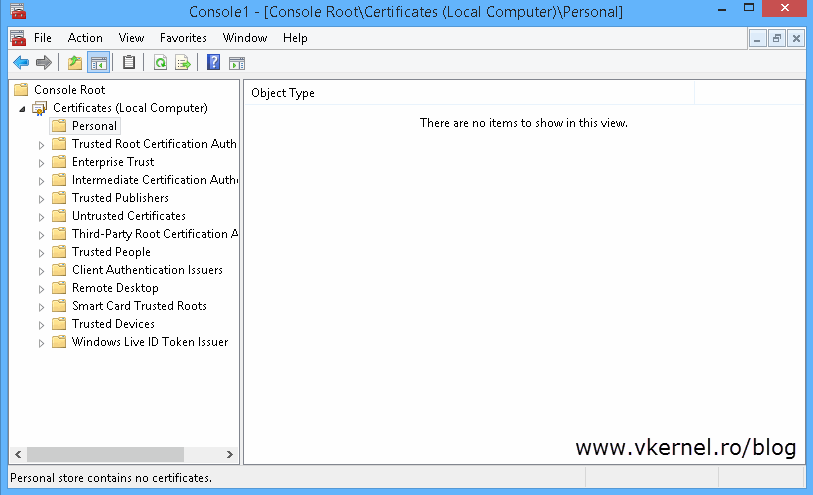
If you look in the Personal folder you can see that there is no certificate. Too see the magic happen in real time do a  gpupdate /force then refresh the console. After this a computer certificate “magically” appears.
Oh yeah, and the certificate also has a private key, which is what we wanted.
Since this is group policy, you will have to wait between 90 and 120 minutes for the policy to get in effect. Then all clients that are affected by this GPO will auto-enroll for a computer certificate from your internal CA. 
User certificates Auto-Enrollment
Now I know that most of you also need a way to auto-enroll for user certificates, so these users can encrypt their personal data or secure their emails. For this, a few things need to be modified or added to your Enterprise Internal CA and user accounts. First of all the users need to have an email address present in the E-mail field of their AD account.
You don’t need to have an email server present in your environment like Exchange server, just an email address typed in the user’s E-mail account field.
 then, a new certificate template needs to be created. Log in to one of your domain controllers and open the Certification Authority console. Right-click the Certificate Templates folder and choose Manage.
Search for the User template, right-click it and choose duplicate.
On the General tab type a name for the new template then go to the Security tab. Here select Domain Users from the ACL (Access Control List) and in the Permissions section check the Enroll (should be already checked, but just in case) and Auto enroll box. Click     
Back on the Certification Authority console, right-click the Certificate Templates folder one more time and choose New > Certificate Template to Issue. From the list, search for the new template, select it and click OK.

Now that the template is ready we need to set up the GPO that request certificates on behalf of the user. Still on this domain controller, open the Group Policy Management console and create a new GPO. Again this can be created/linked to the root of the domain or an OU. If you link it to an OU make sure is the one where users are present not computers.
     
Once you create the GPO, right-click it and choose Edit. In the Group Policy Management Editor console expand User Configuration > Policies > Windows Settings > Security Settings and click on the Public Key Policies folder. Here we have a view almost exactly we had when we configured the computer certificate auto-enrollment. The policy that we are interested in is Certificate Services Client – Auto-Enrollment, so double click it to open its properties; or right-click > Properties.
From the Configuration Model drop-down box choose Enabled then check the Renew expired certificates, update pending certificates, and remove revoked certificates and Update certificates that use certificate templates boxes. Click OK when you’re done.
All you have to do now is wait for the users to get the new policy, and that can take between 90 and 120 minutes. If you don’t want to wait and force this process to see if it works do a gpupdate /force on the client computer. Then if you open the user certificates store you should see the certificate issued for the user that you are logged in with.
Taking a look at the certificate itself it has a private key, it was issued using the template we created and it has all the key usage necessary for the user to encrypt data and email. 


20 May 2015

OneGet find, select and install silently

List all built-in package providers (requires Powershell 5.0)

Find-Packageprovider -Provider bootstrap,

Set Chocolatey as a trsuted package provider

Get-Packageprovider -Name chocolatey -Trusted

Search for multiple packages, select a version and install

Find-Package | Out-Gridview -Title "Select Packages to install" -PassThru | Install-Package -Force

Uninstall installed package

 Uninstall-Package -Name AdobeReader

Source

08 April 2015

Edge servers certificate expired or issuing certificate renewed? Renew the Edgesyncsubscription

When deleting an expired EdgeSyncSubscription certificate from your edge server, the following error is written in the eventlog:


The next error in the eventlog:


When the issuing certificate for your internal PKI CA has to be renewed, don't forget to renew it on the Edge servers as well.

When the Edge servers certificates for the EdgeSyncSubscription are expired, then renew the entire EdgeSyncSubscription.

A complete how to can be found here.

23 March 2015

Lync federation error ID 504 source id 239

When you receive the following error:


The (root) certificate from the company you are trying to federate with is not available.
And by root certificate i mean the CA the company has accuired their certificate; Comodo, Baltimore Cyber Trust, Go Daddy etc.

There are 2 ways to resolve this, find the sipfederationtls SRV DNS record like this:

nslookup -type=SRV _sipfederationtls._tcp.microsoft.com

SRV hostname = sipfed.microsoft.com

Now you can try to get a certificate by guessing webmail domain names because the certificate at https://sipfed.microsoft.com:5061 doesnt return the certificate that you want.


An easier ways is to download the RUCT tool (Remote RU Troubleshotter) found here
Type the domain of the company you want to federate with and select the sipfederationtls SRV record, and on the Certificate Information tab click Go.


After finding the domain you want to federate with you can install the certificate with one mouse click in the local trusted certificate store on the Lync EDGE server.


You can easily find the imported certificate chain in the local trusted root store.