Showing posts with label WIndows 2008 R2. Show all posts

23 May 2017

Start Menu locations - Or add a simple Start Menu yourself without 3rd party tools

I keep forgetting the path to the Start Menu:
"C:\Program Data\Microsoft\Windows\Start Menu\Programs"

This is the same for Windows 7 up to Windows 10, and for Server 2012 to Server 2016.

But, wouldn't it be nice to have some sort of start menu without installing some malware/spyware infested tool? Then this quick fix is for you:

  • Display "Hidden items" on your C: Drive.
  • Open File Explorer and browse to your C: Drive. 
  • On the View tab, check the "Hidden items" checkbox.
  • Add a New Toolbar on your Taskbar.
  • Right-click on a blank area of your Taskbar and select Toolbars > New Toolbars.
  • Browse to the Start Menu\Programs folder.
  • In the New Toolbar dialog box, browse to the "C:\Program Data\Microsoft\Windows\Start Menu\Programs" folder. 
  • Click the "Select Folder" button.
  • Click the "Select Folder" button to add the new Toolbar to your Taskbar.

Here's what it looks like:

12 February 2017

Steps for renewing NDES Service Certificates

Well this was a life saver once again, being on vacation the moment this was implemented, and the supplied documentation by the 3rd party that did that being insufficient, this saved my a s s.
And as stated by the blogger "chdelay" there's not a lot of info to be found on this matter.


For those organizations that used the Network Device Enrollment Service run into the process for renewing the certificates for NDES. I never was able to find good instructions on how to do this. So, I had no choice but to create my own. The steps in this blog posting cover how to renew the certificates used by the Network Device Enrollment Service. You will need to be logged in as an Enterprise Admin for most of the steps outlined in this posting.

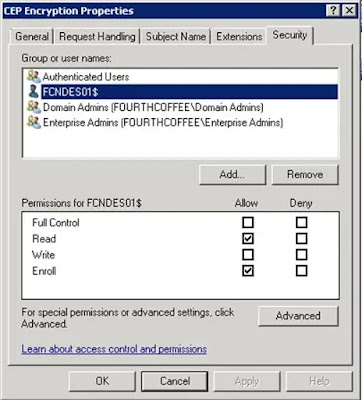
Step 1: First give the NDES Server Read and Enroll permission to the CEP Encryption Certificate Template.

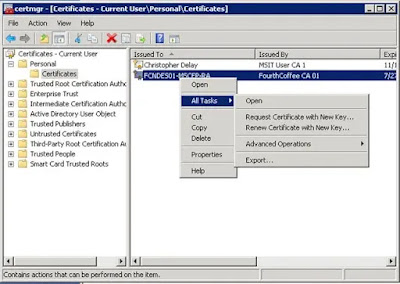
Step 2: Open the certificates MMC targeted to the computer.  Expand Personal.  Right-click on Certificates.  From the context menu select All Tasks then Renew Certificate with New Key…

Step 3: On the Before You Begin page of the wizard, click Next.

Step 4: On the Request Certificates page, click Enroll.

Step 5: On the final page of the wizard, click Finish.

Step 6: Open Certmgr.msc as a user that has Read and Enroll permissions to the Exchange Enrollment Certificate Template.  Expand Personal, right click on Certificates.  Select All Tasks, and then Request New Certificate…

Step 7: On the Before You Begin page, click Next.

Step 8: On the Select Certificate Enrollment Policy page, click Next.

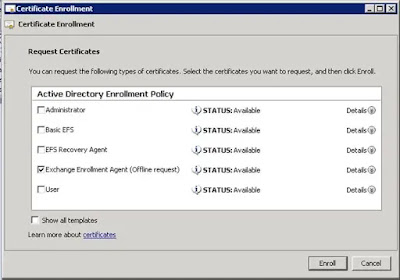
Step 9: Select the Exchange Enrollment Agent certificate template, and click the More information is required to enroll for this certificate. Click here to configure settings. link.

You will want to user the same Subject Name that is in your current Exchange Enrollment certificate. The following steps illustrate the steps needed to do this. You can find the current subject name by opening the Certificates MMC targeted to the local machine and then open the existing Exchange Enrollment Agent certificate. In my example the name was CN=FCNDES01-MSCEP-RA,C=US.

Step 10: Under Subject Name ensure that Common Name is selected and under Value enter the common name that is in your existing certificate. Then click Add.

Step 11: Change the Type to Country and under Type the country code that is your existing Exchange Enrollment Agent certificate.

Step 12: Click Add

Step 13: On the Private Key tab, select Make private key exportable.  Then click OK.

Step 14: Then click Enroll.

Step 15: Right-click on the Exchange Enrollment certificate in the users personal store.  Select Export…

Step 16: When the Certificate Export Wizard opens, click Next.

Step 17: On the Export Private Key page, select Yes, export the private key.

Step 18: On the Export File Format page, select Personal Information Exchange – PKCS #12 (.PFX)

Step 19: On the Password page, enter a password and click Next.

Step 20: On the File to Export page, click the Browse… button.  Select the file name and save location.  When finished click Next.

Step 21: On the final page of the wizard, click Finish.

Step 22: Then click OK.

Step 23: In the Certificate MMC on the NDES Server that is targeted to the computer, expand Personal.  Right-click on Certificates.  From the context menu, select All Tasks and then Import…

Step 24: On the Welcome page, click Next.

Step 25: Browse to the PFX file you previously created, and click Next.

Step 26: On the Password page, enter the password associated with the PFX file.

Step 27: On the Certificate Store page, click Next.

Step 28: On the final page of the wizard, click Finish.

Step 29: Then click OK.

Step 30: In the Certificate MMC on the NDES Server that is targeted to the computer, expand Personal.  Right-click on the old Exchange Enrollment certificate, and select Delete. 

Step 31: Then click Yes, to accept the deletion.

Step 32: Right click on the new Exchange Enrollment certificate.  From the context menu, select All Tasks then Manage Private Keys…

Step 33: Add the NDES service account and ensure that it just has Read permission.  Click OK.

Step 34: Right click on the new CEP Encryption certificate.  From the context menu, select All Tasks then Manage Private Keys…

Step 35: Add the NDES service account and ensure that it just has Read permission.  Click OK.
Step 36:  Reset IIS using iisreset command.

Step 37: Check the following url:
https://localhost/certsrv/mscep

Step 38: Check the following url:
https://localhost/certsrv/mscep_admin

When both pages are displaying the above then you know your NDES/SCEP is working correctly

05 January 2017

AIA and CDP Variable Definitions - What does the % sign stand for

AIA and CDP Variable Definitions

Name
Variable
Description
%1

ServerDNSName
The CA computer’s Domain Name System (DNS) name

%2

ServerShortName
The CA computer’s NetBIOS name
%3
CA Name
The CA’s logical name

%4
CertificateName
The name of the CA’s certificate file

%5
Domain DN
Not used in the Windows Server 2003 PKI

%6
ConfigDN
The Lightweight Directory Access Protocol (LDAP) path of the forest’s configuration naming context for the forest


%7
CATruncatedName
The CA’s “sanitized” name

%8
CRLNameSuffix
The CRL’s renewal extension

%9
DeltaCRLAllowed
Indicates whether delta CRLs are supported by the CA

%10
CDPObjectClass
Indicates that the object is a CDP object in AD DS

%11
CAObjectClass
Indicates that the object is a CA certificate object in AD DS

29 September 2016

Top 30 Quick reminders for SysOps

Came across this over at gfi.com/blog, this is just here for my own quick sneak and peek.
But if you have more quick wins, tips or oneliners let me know and i'll add them.

Networking

  1. netsh int ip reset all will reset your NIC back to DHCP quickly, blanking out all static settings.
  2. net use will show you all open SMB connections on your machine.
  3. If you need to grab a quick network capture, but aren’t allowed to install Wireshark or another similar tool, open an admin command prompt and run netsh trace start capture=yes tracefile=c:\capture.etl to create a file you can open in Wireshark or Netmon later. Use netsh trace stop to end the capture.
  4. If you just need to know what is happening, but not capture a trace, use netstat as a poor man’s packet analyzer. netstat –ano 1 | findstr X will update once a second and highlight whatever you replace X with, like :443 or SYN_SENT or the destination ip.addr you are trying to confirm your machine is attempting to communicate with.
  5. netstat –e can give you a quick diagnosis of layer 2. Watch out for high or increasing numbers of errors.
  6. Grab the TCPING utility from http://www.elifulkerson.com/projects/tcping.php and use it to monitor not just when a server reboots, but when a service is back up. Try tcping –t –b 2 addr 3389 when you reboot a Windows server. It will start to use your default beep sound when the service starts responding to SYN requests, so you know you can RDP back into the box after a reboot.
  7. Use netstat –r to dump your IP routing table so you can see if everything goes to the default gateway, or somewhere unexpected.
  8. Download BIND for Windows from https://www.isc.org/downloads/# and use the Windows ports of DIG and HOST to do DNS queries.
  9. And if you like DIG and HOST, grab the whois port from https://technet.microsoft.com/en-us/sysinternals/bb897435 to do command line lookups of domain names and IP networks.

Active Directory

  1. netdom query fsmo will list all the Flexible Single Master Operations members in your domain, so you can find the PDC emulator, schema master, etc.
  2. repadmin /replsummary will give you a quick status on AD replication. It will also let you know if you cannot reach a domain controller from the machine on which you run the command.
  3. repadmin /syncall will trigger an AD replication so you don’t have to wait.
  4. net accounts will list the domain security policy.
  5. gpresult /v will dump all the Group Policy Object settings affecting you and the machine you’re on.
  6. whoami and whoami /groups will confirm your AD account and group memberships.
  7. set l will let you know what domain controller authenticated you, or if you are running with cached credentials.

Windows

  1. Use the Windows+Arrow Keys to move windows around, including both half- and quarter-monitor views.
  2. Windows+Tab to bring up a quick preview of all running applications.
  3. Windows+X brings up the Quick Access Menu.
  4. Windows+P brings up projection options for when you connect to a second monitor or projector.
  5. Windows+number will launch whatever app is in that numeric position, from left to right, on your taskbar.
  6. CTRL+SHIFT+P launches an “In Private” session of Internet Explorer.
  7. Use the Problem Steps Recorder to automatically capture screenshots of a process or procedure. It’s great for documentation and training too. Windows+R, PSR, Enter!
  8. Run powercfg –h off to turn off hibernation, and buy back several GB of disk space by dropping the hiberfil.sys file that is just taking up space on your hard drive.
  9. Look up most error codes at the command prompt by downloading the Microsoft ERR tool and saving it in your path.
  10. All the Sysinternals command-line tools can be executed from the web using \\live.sysinternals.com\tools\toolname*. Check out http://live.sysinternals.com/ for all the tools that are there.

PowerShell

  1. If you are not sure of a command, run get-command *something* to get a list of appropriate commands.
  2. Use get-help command to get help on a command. –full gives you everything, -examples just lists some examples, and –online brings up the online help.
  3. PowerShell v4 and later has copy and paste already turned on, and can use the highlight, CTRL-C, CTRL-V just like any other Windows app.
  4. There are 155 aliases in PowerShell v5, making cmdlets from DOS and Linux available to you in PowerShell. Run alias to see all the ones that are built-in, and use the alias command to create your own.

22 October 2015

How to Microsoft LAPS Local Administrator Password Solution

This is something I implemented at our company.
It's pretty straight forward, if you get the access rights right.

Microsoft is offering the Local Administrator Password Solution (LAPS) that provides a solution to the issue of using a common local account with an identical password on every computer in a domain. LAPS resolves this issue by setting a different, random password for the common local administrator account on every computer in the domain. Domain administrators using the solution can determine which users, such as help-desk administrators, are authorized to read passwords.
Compromised identical local account credentials could allow elevation of privilege if an attacker uses them to elevate from a local user/administrator to a domain/enterprise administrator. Local administrator credentials are needed for occasions when logon is required without domain access. In large environments, password management can become complex, leading to poor security practices, and such environments greatly increase the risk of a Pass-the-Hash (PtH) credential replay attack.
LAPS simplifies password management while helping customers implement recommended defenses against cyber-attacks. In particular, the solution mitigates the risk of lateral escalation that results when customers use the same administrative local account and password combination on their computers.

This part came from PeteNetLive, and worked like a charm:

Download LAPS from here


Install Laps on a DC with all the options. (if you apply the defaults it will only install the GPO Extensions), which is what you would want on the 'controlled machines'.


Install the LAPS software to the target machines, in fact it's just a copy of some files.

msiexec /i \\Server\Share\laps.x64.msi /quiet

or
msiexec /i c:\laps.x64.msi /quiet

Extend Active Directory Schema:

On the management machine run the following two PowerShell commands, to add the two new attributes to Active Directory.

Import-Module AdmPwd.PS
Update-AdmPwdADSchema 


Check/Set Permissions to Read Local Admin Passwords

grant the rights to the computers themselves to be able to update the password in Active Directory. (If you have nested OU's, simply apply on the top level OU). Change the value in red to suit your own OU/OU's.

Set-AdmPwdComputerSelfPermissions -OrgUnit 'Domain Computers'


To see who has rights to view the passwords in AD (for a given OU), use the following command. Below you can see the default of SYSTEM and Domain Admins is displayed.

Find-AdmPwdExtendedRights -Identity 'Domain Computers'


To grant read password permissions to a particular group, use the following syntax, below I have an AD group called HelpDesk setup and I'm adding them into the AD ACL to be able to read local administrator passwords for the Domain Computers OU.

Set-AdmPwdReadPasswordPermissions -Orgunit 'Domain Computers' -AllowedPrinciples PeteNetLive\HelpDesk

Note: If you have multiple groups you can separate/delimit them with a comma.

Deploy the GPO Extensions to 'Controlled' Machines

On the management machine, create a new GPO object, and link it to the OU containing the computers/servers you want to apply the password settings to.


Edit the GPO.


Navigate to:
      
Computer Configuration > Policies > Administrative Templates > LAPS


The policy that turns LAPS on is the last one 'Enable local admin password management' > Enable it.


The actual complexity and age of the password is set in the 'Password Settings' policy, > Enable it and accept the defaults.
Note: the other two policies are;
Name of the administrator account to manage: Use if you you have manually created another common admin account on all your machines NOT if you have renamed the local administrator account.
Do not allow password expiration time longer than required by policy: Set to Enabled.


View the Local Admin Passwords for Controlled Machines.

1. You can do this from PowerShell with the following command;
Get-AdmPwdPassword -ComputerName hostname


Or if you have installed the Fat client, you can launch that from;
C:\Program Files\LAPS\AdmPwdUI.exe


Or as it's an AD object attribute, you can view it on the Computers AD object.


Source 1
Source 2