22 December 2015

Enable Exchange 2013 Remote PowerShell over SSL

I ran in to this super clear explanation from Damian Scoles on how to configure remote PowerShell over SSL when my remote PowerShell wasn't working.

I covered the same subject once before here - remote-powershell-sessions-for-ad

This goes on step further in securing the session:

For Office365 an SSL connection to remote PowerShell is default.
$LiveCred = Get-Credential
$Session = New-PSSession -name ExchangeOnline -ConfigurationName Microsoft.Exchange -ConnectionUri https://ps.outlook.com/powershell/ -Credential $LiveCred -Authentication Basic -AllowRedirection
Import-PSSession $Session
Also note that the authentication type is BASIC.

If you try to force the PowerShell virtual directory to only accept SSL, you break local PowerShell access:
Set-PowerShellVirtualDirectory -Server ex01 -RequireSSL $true

Now that PowerShell access is broken we cannot run PowerShell commands to fix the PowerShell Virtual Directory? So switch to IIS Manager. At the PowerShell virtual directory ‘Require SSL’ is checked:
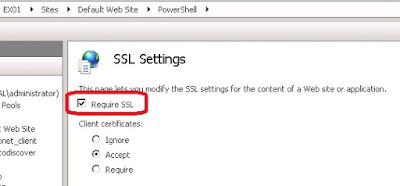

Uncheck the box and click apply.

Local Exchange PowerShell is working again.
Now how do we enable SSL remote PowerShell?
Lets make sure we can do PowerShell remoting over HTTP:

Verify it’s enabled:
Enter-PSSession -ComputerName localhost
If you receive an error, then PowerShell remoting can be enabled with this command:
Enable-PSRemoting
Choose ‘A’ for the answer to the two questions:


Now that we have PowerShell enabled, verify the user account you want to connect with has access:
Get-User <alias> |ft displayname,*power*,
If the result is True, then the user has permission to connect remotely via PowerShell.

What about SSL? Let’s see what happens by default:
New-PSSession -ConfigurationName Microsoft.Exchange -ConnectionUri http://<exchange server FQDN>/PowerShell/ -Credential (Get-credential) -Authentication Kerberos
** Note ** Using Basic for Authentication method will cause the connection to fail. Either have no

Authentication defined, or choose something like kerberos in our example.

You will be prompted for credentials and allowed to connect. If however the connectionURI contains HTTPS and not HTTP, it will fail.
New-PSSession -ConfigurationName Microsoft.Exchange -ConnectionUri https://<exchange server FQDN>/PowerShell/ -Credential (Get-credential) -Authentication Kerberos

So what is the fix? IIS Authentication. The PowerShell virtual directory has no authentication settings configured
Get-PowerShellVirtualDirectory -Server <Exchange Server> | fl *auth*


Notice that no authentication is configured by default. Let’s enable Basic Authentication as this will allow us to use an SSL connection to remotely connect via Powershell.
Get-PowerShellVirtualDirectory -Server <exchange server> | Set-PowerShellVirtualDirectory -BasicAuthentication $true

Now that we have verified PowerShell Remoting is enabled, that our user account has access and that Basic Authentication is enabled, we should be able to connect via HTTPS:


We now have a successful connection to our remote Exchange 2013 server over HTTPS.

Source

16 December 2015

Export email addresses, username and displayname from AD group to text file

Sometimes I get asked to export certain properties from AD or Exchange because I tend to do things with Powershell for ease of use.

Same goes for this request, retrieve the members from an AD group and display the username, displayname and emailaddress and export it to a file:

$groupname = "AD group name"

 Get-ADGroupmember $groupname | %{get-aduser $_.samaccountname -properties cn,samaccountname,emailaddress | select cn,samaccountname,emailaddress | Out-File c:\temp\output.txt

07 December 2015

Add Private computer and Lite version options back to OWA

When searching how to brand the OWA page with a server name, i came across this post by  Arjan Mensch.

It describes how to add the Lite OWA version and the Private computer options back in to OWA 2013 (and maybe even 2016, but i'm not able to test this).

As you may remember from Exchange 2010, there was an option to choose your privacy mode for the session:

  • This is a public or shared computer
  • This is a private computer
  • Use Outlook Web App Light


Choosing between public or shared means different timeout values for the OWA session.

To bring the public private option back to OWA run in the Exchange powerShell:
Get-OwaVirtualDirectory | Set-OwaVirtualDirectory -LogonPagePublicPrivateSelectionEnabled $true

To bring back the Light version of OWA:
Get-OwaVirtualDirectory | Set-OwaVirtualDirectory -LogonPageLightSelectionEnabled $true

To enable both the "private public" and "Lite" option for several servers in a nice onliner:
Get-OwaVirtualDirectory | Where-Object {$_.owaversion -eq "Exchange2013"} | Set-OwaVirtualDirectory -LogonPagePublicPrivateSelectionEnabled $true -LogonPageLightSelectionEnabled $true


After running these command-lets you need to restart IIS.
To do this for all servers you can run this:
$servers = "server1","server2","server3","server4","server5","server6"
foreach ($server in $servers) 
{
restart-service -servicename "w3svc"
}

Brand OWA 2013 logon page

Just like in Exchange 2007 and 2010, the Outlook web app page can be customized to your needs.

See my previous post about this here.

In my organization we use 6 multi role Exchange 2013 servers, and when logging on to OWA you can't quickly see on which server you ended up.

This can be edited fairly quickly, but keep in mind that all these changes are undone when updating the Exchange systems with a cumulative update (CU).

First you need to go to the following location:
C:\Program Files\Microsoft\Exchange Server\V15\FrontEnd\HttpProxy\owa\auth
In there you will find a file called "logon.aspx", open it in your editor of choice.

For me that's Notepad++, and on line 272 add the following line:

<p><span style="color: #FFFFFF;">SERVERNAME</span></p>

This will add your servername in white text. So if you want to see it you'll have to select the entire logon page by pressing CTRL + a, then you will see the servername.


Important Note: These edits are overwritten anytime an Exchange Server update is applied to the CAS servers.
This is because every update includes a complete reinstallation of the Exchange binaries, and the logon.aspx file you edited will be overwritten.


Typically, the logon.aspx page rarely changes, so you can usually make a copy of it after you've made your edits and copy it back after the update. However, there are no guarantees that the file will not be changed by an update. If so, you will need to re-edit the logon.aspx file.

After each installation of a cumulative update for Exchange 2013, remember to execute both the UpdateCas.ps1 and UpdateConfigFiles.ps1 Windows PowerShell scripts.
It will save you a lot of trouble, troubleshooting errors with OWA and ECP.