Showing posts with label Active Directory. Show all posts

21 January 2022

Count your Active directory objects

When installing AADConnect you need to size your server according to this table:

Hardware requirements for Azure AD Connect

The following table shows the minimum requirements for the Azure AD Connect sync computer.


To quickly count all objects in your Active Directory do this:

1|
(Get-ADObject -SearchBase "dc=Mydomain,dc=com" -LDAPFilter "(objectCategory=*)").Count

This will show all objects.

If you want to know how many user, group, computer account, distribution group and security group objects there are do this:
1|
2|
3|
4|
5|
6|
7|
$ADUser = (Get-AdUser -Filter *).Count
$ADGroup = (Get-ADGroup -Filter *).Count
$ADComputer = (Get-ADComputer -Filter *).Count
$Distribution_Groups = (Get-ADGroup -Filter {GroupCategory -eq "Distribution"}).count
$Security_Groups = (Get-ADGroup -Filter {GroupCategory -eq "Security"}).count
$ADObjects = $ADUser + $ADGroup + $ADComputer + $Distribution_Groups + $Security_Groups
$ADObjects

30 January 2019

Export AD OU's Users and Groups & Import to test AD with a new domain name

Well this was a fun task, export Active Directory OU's, all users and groups and import everything into a new test active directory with a different domain name.

First export every thing I need:
-OU's:
Get-ADOrganizationalUnit -filter * | select Name,DistinguishedName | Export-csv -path C:\temp\OUexport.csv -NoTypeInformation
-Users: (per specific OU)
Get-ADUser -Filter * -SearchScope OneLevel -SearchBase "OU=Users,DC=domain,DC=lan" -Properties CanonicalName,CN,DisplayName,GivenName,Name,Surname | Export-Csv "C:\Temp\PeopleExport.csv"
Get-ADUser -Filter * -SearchScope OneLevel -SearchBase "OU=External,OU=Users,DC=domain,DC=lan" -Properties CanonicalName,CN,DisplayName,GivenName,Name,Surname | Export-Csv "C:\Temp\ExternalExport.csv"
Get-ADUser -Filter * -SearchScope OneLevel -SearchBase "OU=Regular Accounts,OU=Users,DC=domain,DC=lan" -Properties CanonicalName,CN,DisplayName,GivenName,Name,Surname | Export-Csv "C:\Temp\RegularAccountsExport.csv"
Get-ADUser -Filter * -SearchScope OneLevel -SearchBase "OU=RandomName,OU=External,OU=Users,DC=domain,DC=lan" -Properties CanonicalName,CN,DisplayName,GivenName,Name,Surname | Export-Csv "C:\Temp\RandomNameExternalExport.csv"
-Groups:
Get-ADgroup -filter * | select Name,DistinguishedName,samaccountname,groupcategory,groupscope | Export-csv -path "C:\temp\GroupsExport.csv"
Then copy the .csv's to the new domain controller in C:\Temp.
Go through the files an find and replace the domainname to the new domainname.

You have to do something extra for the Group's.
In Notepad++ search and replace the CN- value for the DistinguishedName value.
It will look like this in the csv file:
"Name","DistinguishedName","samaccountname","groupcategory","groupscope"
"HelpServicesGroup","CN=HelpServicesGroup,DC=NewDomain,DC=local","HelpServicesGroup","Security","DomainLocal"

But it needs to be:
"Name","DistinguishedName","samaccountname","groupcategory","groupscope"
"HelpServicesGroup","DC=NewDomain,DC=local","HelpServicesGroup","Security","DomainLocal"

This is because the CN does not exist yet.
To replace the "CN=*," value use this in notepad++: \CN=.*?,
Where "\CN=" searches for "CN=", "*" searches for everything between "=" and "," and "?," stops the search where the "," is found.

Then import:
-OU's:
#Import AD Module - RSAT must be installed or run from DC
Import-Module ActiveDirectory
#Varibale location for CSV file
$ous = Import-Csv -Path "C:\temp\OUexport.csv"
# For each function to create OU's 
foreach ($ou in $ous)  
{               
# Function Variables
    $ouname = $ou.name
    $oudn = $ou.DistinguishedName
# Function
    New-ADOrganizationalUnit -Name $ouname -Path $oudn  -ManagedBy 'domain admins'
}
-Users:
Import-Csv .\PeopleExport.csv | New-ADUser -Enabled $True -Path 'OU=People,DC=sapgrc,DC=local' -AccountPassword (ConvertTo-SecureString Pass123 -AsPlainText -force)            
Import-Csv .\externenExport.csv | New-ADUser -Enabled $True -Path 'OU=Externen,OU=People,DC=sapgrc,DC=local' -AccountPassword (ConvertTo-SecureString Pass123 -AsPlainText -force)            
Import-Csv .\algemeneaccountsexport.csv | New-ADUser -Enabled $True -Path 'OU=Algemene Accounts,OU=People,DC=sapgrc,DC=local' -AccountPassword (ConvertTo-SecureString Pass123 -AsPlainText -force)            
Import-Csv .\testexternenExport.csv | New-ADUser -Enabled $True -Path 'OU=TEST,OU=Externen,OU=People,DC=sapgrc,DC=local' -AccountPassword (ConvertTo-SecureString Pass123 -AsPlainText -force)
-Groups:
#Import AD Module - RSAT must be installed or run from DC            
Import-Module ActiveDirectory            
#Import CSV            
$csv = Import-Csv -Path "C:\Temp\GroupsExport.csv"            
#Loop through all items in the CSV            
ForEach ($item In $csv)            
{            
    #Create the group if it doesn't exist            
    $create = New-ADGroup -Path $item.DistinguishedName -SamAccountName $item.SamAccountName -GroupCategory $item.GroupCategory -GroupScope $item.GroupScope -Name $item.Name             
    Write-Host "Group $($item.Name) created!"            
}            


And there you have it.

14 April 2016

Remove MailboxDatabase - This mailbox database contains one or more mailboxes…

A common error, with numerous google search hits to over come the most common problems when deleting a mailbox database. But this is a nasty one, turns out that Set-AdServerSettings -ViewEntireForest $True doesn't always show you exactly what is happening.

This was the case in my case. I couldn't get the database removed, and than i found this.

Delete the mailboxdatabase:
Remove-MailboxDatabase databasename -Verbose

It then shows the reason why it can't be deleted.
In my case it was a systemmailbox that wasnt showing when i did
get-mailbox -database databasename


Now i could see what the reason was why the deletion stopped.

1. Start the Active Directory Users and Computers snap-in.

2. On the View menu, make sure that Advanced Features is selected.

3. Locate the Microsoft Exchange System Objects container.

4. Delete the SystemMailbox{yournumber} item.

16 December 2015

Export email addresses, username and displayname from AD group to text file

Sometimes I get asked to export certain properties from AD or Exchange because I tend to do things with Powershell for ease of use.

Same goes for this request, retrieve the members from an AD group and display the username, displayname and emailaddress and export it to a file:

$groupname = "AD group name"

 Get-ADGroupmember $groupname | %{get-aduser $_.samaccountname -properties cn,samaccountname,emailaddress | select cn,samaccountname,emailaddress | Out-File c:\temp\output.txt

22 October 2015

How to Microsoft LAPS Local Administrator Password Solution

This is something I implemented at our company.
It's pretty straight forward, if you get the access rights right.

Microsoft is offering the Local Administrator Password Solution (LAPS) that provides a solution to the issue of using a common local account with an identical password on every computer in a domain. LAPS resolves this issue by setting a different, random password for the common local administrator account on every computer in the domain. Domain administrators using the solution can determine which users, such as help-desk administrators, are authorized to read passwords.
Compromised identical local account credentials could allow elevation of privilege if an attacker uses them to elevate from a local user/administrator to a domain/enterprise administrator. Local administrator credentials are needed for occasions when logon is required without domain access. In large environments, password management can become complex, leading to poor security practices, and such environments greatly increase the risk of a Pass-the-Hash (PtH) credential replay attack.
LAPS simplifies password management while helping customers implement recommended defenses against cyber-attacks. In particular, the solution mitigates the risk of lateral escalation that results when customers use the same administrative local account and password combination on their computers.

This part came from PeteNetLive, and worked like a charm:

Download LAPS from here


Install Laps on a DC with all the options. (if you apply the defaults it will only install the GPO Extensions), which is what you would want on the 'controlled machines'.


Install the LAPS software to the target machines, in fact it's just a copy of some files.

msiexec /i \\Server\Share\laps.x64.msi /quiet

or
msiexec /i c:\laps.x64.msi /quiet

Extend Active Directory Schema:

On the management machine run the following two PowerShell commands, to add the two new attributes to Active Directory.

Import-Module AdmPwd.PS
Update-AdmPwdADSchema 


Check/Set Permissions to Read Local Admin Passwords

grant the rights to the computers themselves to be able to update the password in Active Directory. (If you have nested OU's, simply apply on the top level OU). Change the value in red to suit your own OU/OU's.

Set-AdmPwdComputerSelfPermissions -OrgUnit 'Domain Computers'


To see who has rights to view the passwords in AD (for a given OU), use the following command. Below you can see the default of SYSTEM and Domain Admins is displayed.

Find-AdmPwdExtendedRights -Identity 'Domain Computers'


To grant read password permissions to a particular group, use the following syntax, below I have an AD group called HelpDesk setup and I'm adding them into the AD ACL to be able to read local administrator passwords for the Domain Computers OU.

Set-AdmPwdReadPasswordPermissions -Orgunit 'Domain Computers' -AllowedPrinciples PeteNetLive\HelpDesk

Note: If you have multiple groups you can separate/delimit them with a comma.

Deploy the GPO Extensions to 'Controlled' Machines

On the management machine, create a new GPO object, and link it to the OU containing the computers/servers you want to apply the password settings to.


Edit the GPO.


Navigate to:
      
Computer Configuration > Policies > Administrative Templates > LAPS


The policy that turns LAPS on is the last one 'Enable local admin password management' > Enable it.


The actual complexity and age of the password is set in the 'Password Settings' policy, > Enable it and accept the defaults.
Note: the other two policies are;
Name of the administrator account to manage: Use if you you have manually created another common admin account on all your machines NOT if you have renamed the local administrator account.
Do not allow password expiration time longer than required by policy: Set to Enabled.


View the Local Admin Passwords for Controlled Machines.

1. You can do this from PowerShell with the following command;
Get-AdmPwdPassword -ComputerName hostname


Or if you have installed the Fat client, you can launch that from;
C:\Program Files\LAPS\AdmPwdUI.exe


Or as it's an AD object attribute, you can view it on the Computers AD object.


Source 1
Source 2

27 October 2014

Exchange 2013 Password Reset Tool

Just like in Exchange 2010 there is a password reset tool, but it's not enabled by default.
See my previous post here.

In Exchange 2013 the same options is present by the change of a registry.

From Petri.com comes the following excellent post:

The configuration to allow users to change their expired passwords involves:
  • Setting the appropriate registry key on your Exchange 2013 CAS Servers
  • Configuring settings within IIS on your Exchange 2013 CAS Servers
  • Configuring correct password policy on AD domain level
The following example moves through these three steps in more detail. Imagine a default non-admin mailbox user whose password setting has been configured to “Change password at next logon”. This is the default setting for newly-created users in most organizations. The setting is also valid when a user’s password has expired.

1. Set appropriate registry key on the Exchange 2013 CAS Servers

This registry key is not terribly different from Exchange 2010.
1)     Open your Registry Editor (regedit.exe)
2)     Browse to the following key:
HKey_Local_MachineSystemCurrentControlSetServicesMS Exchange OWA
3)     There should be a REG_DWORD Value String of “ChangeExpiredPasswordEnabled”, and that key has a value of “1”. You can change this key manually. If the key should be active but has a value of zero (0), make sure you set it to “1”.

2. Configure settings in IIS on your Exchange 2013 CAS Servers

1)     On your Exchange 2013 CAS Server(s), open the IIS Admin Console.
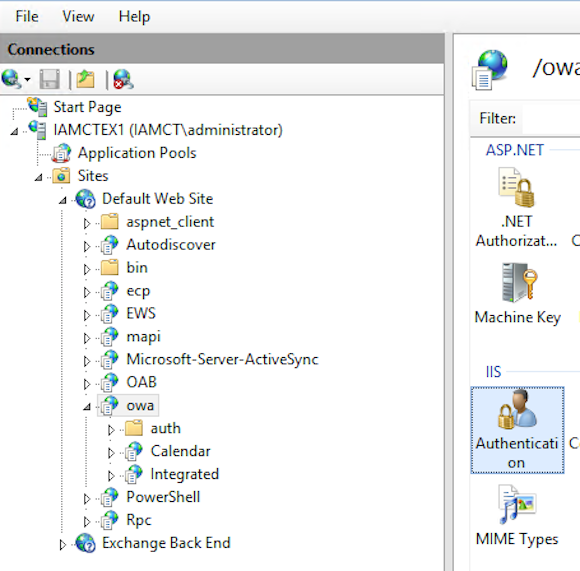
2)     Browse to Server / Sites / Default Web Site / OWA.
3)     Select “HTTP Redirect” and open its properties.


4)     Make sure the HTTP redirect checkbox is not checked.


5)     Browse to Server / Sites / Default Web Site / OWA.
6)     Select “Authentication” and then select Basic Authentication.

7)     Right-click Edit.
8)     In the Default Domain field text field, enter a backslash – ““.

9)     Save your settings and close the IIS Admin Console.
10)  From a command prompt with Admin rights, run “IISReset /noforce” to reset the IIS services. In some scenarios the IISReset will fail, in which case you can try to manually restart the “Worldwide Web Publishing Service”. If you can’t manually restart, execute a reboot of the server as last resort.
Sponsored

3. Configure correct password policy settings at Active Directory domain level

Please note: The following settings are valid in a lab environment and updated to demonstrate the specific scenario where we want OWA to prompt a user to reset his or her password upon logon. In the lab environment this was accomplished by setting “change password at next logon.” In your environment it could be based on password expiration policy. In the lab we set it to a “zero day policy” that forces users to reset their password immediately.
1)     From a Domain Controller in your domain (or from an admin workstation with the RSAT tools installed), open the Group Policy Management Editor.

2)     Browse to Default domain policy. Right-click and select Edit. (Note: depending on your environment, it could be a best practice to create a specific GPO for the password policy settings)

3)     Next, browse to Computer Configuration / Policies / Windows Settings / Security Settings / Account Policies / Password Policy.
4)     Change the Minimum Password Age to “0”. This setting refers to the number of days a user must have used his password before it can be reset. In the lab environment we set this to zero to make it effective immediately. In your environment this policy setting could be different.

5)     Lastly, we will force our demo mailbox user to have his or her password changed. This is done via the  Active Directory Users & Computers / user account / properties / User must change password at next logon path.
Please note: Make sure that both the “user cannot change password” and “Password never expires” settings are disabled. Otherwise the change password feature in OWA won’t work.

Final Step: Test the change password feature from within the OWA logon page

1)     Open up our OWA logon page by going to https//<servername>/OWA
2)     Enter your AD mailbox user credentials.
3)     You will receive a notification that your password has expired and will be prompted to enter your old/new password.


4)     After successfully entering your new credentials, you will be informed you have to re-authenticate using the new credentials. After that, your mailbox user should have logged on to his or her OWA environment successfully.

Source

09 July 2014

Set Active Directory user property's with Powershell

Need to edit a user property here's how:


To set the Dail-in property to deny access, you look for the corresponding value, in this case:
"msNPAllowDailin" which is set to TRUE.

In Powershell you type:set-ADUser username -Replace @{msnpallowdialin=$false}

Now when you look at the same value in the attribute editor it displays FALSE.


I haven't tried it but i guess everything that has a value can be changed or edited by the same command.
If you know some others, or disagree let me know.