Showing posts with label Skype for Business. Show all posts

14 December 2018

Get-CsWebTicket : Failed to logon with given credentials. Make sure correct user name and password provided.

When trying to login to Skype Online through PowerShell or the Skype for Business control panel you receive the following error:
The WinRM client cannot process the request. Basic authentication is currently disabled in the client configuration. Change the client configuration and try the request again.

Or this one:

Get-CsWebTicket : Failed to logon with given credentials. Make sure correct user name and password provided.

Then the search begins, and brought me to this:
View the current winrm settings to check whether "basic authentication" has been disabled or not.
winrm get winrm/config/client/auth
Auth
    Basic = true [Source="GPO"]
    Digest = true [Source="GPO"]
    Kerberos = true
    Negotiate = true
    Certificate = true
    CredSSP = false

For me it was set with a GPO.
Trying to set it with this:

winrm set config/client/auth/ @{basic="true"}

Update:
Set-Item WSMan:\localhost\Client\Auth\Basic -Value 'True'

Error: Invalid use of command line. Type "winrm -?" for help.
That didn't go as planned.
The tried to set it in the registry with this:
Open regedit as admin and go to:
HKEY_LOCAL_MACHINE\SOFTWARE\Policies\Microsoft\Windows\WinRM\Client

Simply change the DWORD from 0 to 1 and then restart the PowerShell console

Well that's nice but no solution.

Then searched for the other error, the one with the Get-CSWebTicket error.
Which led me to this:
Since Skype for Business Control Panel don’t support two-step verification we will need to to set up an “app password” for our Office 365 admin account that has MFA enabled.

Oh, really...and yes I just enabled the force MFA option policy in Azure: "Baseline policy: Require MFA for admins (Preview)".

Created an app password an pasted it in my SkypeOnline PowerShell module and voila I was in once again.

21 September 2018

Move multiple users from Skype on-premises to Skype Online - Bulk Move-CSUser

There isn't much to be found about this.
I needed to move a list of users from our on-premises Skype for Business 2015 servers to Skype Online.
I know how to do this one user at a time.
$cred = Get-Credential username@tenanant.com            
Move-CsUser -Identity UPN -Credential $cred -Target sipfed.online.lync.com -Confirm:$false

Thats nice and all, but I had a list of 15 users.
I came across this post from Brett Janzen:
He deserves a shit load of traffic to his site for this strike of genius :-)
He created a script to move users from on-premises to Online, to check if they are enabled if the move went well or not and notify you of this by email.

His version can be found here, I made some adjustments because my environment reacted a bit differently.


# Edit this script at lines: 4, 13, (possibly at 17), 23, 32, 46, 51 and 58 to 61            
            
#This 1 liner creates the hash file that we will need in the next script. Needs to be run only the first time, or if password changes            
Read-Host -Prompt "Enter your tenant password" -AsSecureString | ConvertFrom-SecureString | Out-File "cred.txt"            
             
#-------------------------            
#Script starts here:            
#-------------------------            
            
#Time Stamp used for file naming            
$DTStamp = get-date -f "dd-MM-yyyy HH-mm"            
#This uses a hash value of the password for the service user. This will allow us to run the script with out being asked            
$AdminName = "username@tenant.onmicrosoft.com"            
$Pass = Get-Content "cred.txt" | ConvertTo-SecureString            
$credential= new-object -typename System.Management.Automation.PSCredential -argumentlist $AdminName, $Pass            
#Initialize session            
$session = New-CsOnlineSession -Credential $credential #-OverrideAdminDomain "domain.com"            
Import-PSSession $session -AllowClobber            
Set-ExecutionPolicy Unrestricted -force            
#The Beginning of the inspection of users that will be moved            
#Does the userlist file exist?            
If ((test-path "userlist.txt") -eq $False) {            
Send-MailMessage -from "Skype@domain.com" -to "admin@domain.com"-subject "Skype Migrations: No File" -body "Looks like we dont have a file to work with" -smtpServer smtp.domain.com            
}else{            
#check to see if the users are enabled. This will output new file for working with.            
ForEach ($UserToBeMigrated in (Get-Content userlist.txt)) {            
get-csuser $UserToBeMigrated | Where-object {$_.Enabled -eq $False} | Select-object -expandProperty sipaddress | Out-File NotEnabledUsers.txt -append            
get-csuser $UserToBeMigrated | Where-object {$_.Enabled -eq $True} | Select-object -expandProperty sipaddress | Out-File EnabledUsers.txt -append            
}            
#Start of moving users to the cloud with enabledusers.txt            
ForEach ($UserToBeMigrated in (Get-Content EnabledUsers.txt)) {            
Move-CsUser $UserToBeMigrated -Target sipfed.online.lync.com -Credential $credential -Confirm:$False #-verbose #-HostedMigrationOverrideUrl "https://youradmindomainname.online.lync.com/HostedMigration/hostedmigrationservice.svc" -ProxyPool "proxypool.domain.com"             
}            
# Lets give it a pause for any replication delays            
Start-Sleep 60            
#Lets verify the users where migrated            
ForEach ($UserToBeMigrated in (Get-Content EnabledUsers.txt)) {            
Get-CsUser $UserToBeMigrated | where-object {$_.hostingprovider -ne "sipfed.online.lync.com"} |Select-object -ExpandProperty Sipaddress | out-file LeftOvers.txt -Append            
}            
#If there were users that didnt move it will show up in the left overs file            
If ((Get-Content "LeftOvers.txt") -eq $Null) {            
ForEach ($UserToBeMigrated in (Get-Content EnabledUsers.txt)) {            
get-csuser $UserToBeMigrated | select-object SipAddress, HostingProvider | Out-file completedList.txt -append            
}            
#If it passes lets send an email to the admin with some txt files to look through if he or she wants to            
Send-MailMessage -from "Skype@domain.com" -to "admin@domain.com" -subject "Move Complete" -body "Passed on first try. Logs attached" -Attachment "CompletedList.txt","NotEnabledUsers.txt" -smtpServer smtp.domain.com            
#Cleanup!            
rename-item -path completedList.txt -newName "CompletedList- $DTStamp.txt"            
} else {            
#If there is failure email and let the admin know            
Send-MailMessage -from "Skype@domain.com" -to "admin@domain.com" -subject "Move Had Errors" -body "Looks like there was a failure. Logs attached" -attachment "LeftOvers.txt" -smtpServer smtp-lb.domain.com            
#Here we could add another try to see if we can move the users again. This is a work in progress            
}            
}            
#Close them sessions            
get-pssession | remove-pssession            
#Clean Up            
rename-item -path "D:\Scripts\Move-CSUser to Skype Online\leftovers.txt" -newName "_LeftOvers- $DTStamp.txt"            
rename-item -path "D:\Scripts\Move-CSUser to Skype Online\userlist.txt" -newName "_UserList- $DTStamp.txt"            
rename-item -path "D:\Scripts\Move-CSUser to Skype Online\NotEnabledUsers.txt" -newName "_NotEnabledUsers- $DTStamp.txt"            
rename-item -path "D:\Scripts\Move-CSUser to Skype Online\EnabledUsers.txt" -newName "_EnabledUsers- $DTStamp.txt"

24 May 2017

Skype for Business 2015 Frontend Service won't start - Don't disable TLS 1.0 Event ID: 32192 & 32179

Finally figured it out.
Our Skype for Business 2015 Server Front-End service wouldn't start, it kept displaying "Starting".
The event-viewer kept filling up with:
Event ID: 32192

Closing routing group service due to an error.

Calling ReportFault on routing group {3C86EE90-FB81-5FC0-9B41-2C787B4ACC20} with FaultType 2 and ReasonCode 3. Error code: 0x00000000(ERROR_SUCCESS)
Cause: This may indicate a problem with the routing group. Please examine the server event logs and traces to identify the cause.
Resolution:
Run the commandlet Get-CsPoolFabricState -RoutingGroup [ROUTING GROUP] and make sure quorum is achieved. If the Pool is running and the Front-End is just started, this is normal for some time. If the error persists while the Front-End is running, restart the server.

And:
Event ID: 32179

Request to sync data from backup store for routing group {353B9BC5-A12D-578B-BAD5-F7F8BD5E02FC} was throttled due to pending requests.
Cause: This can happen when a Pool is re-started, and should go away automatically.

Turns out TLS 1.0 was disabled but this would be effective after the first reboot.
So when we rebooted for the latest WSUS updates it got activated and thereby killing the RTCSRV.exe service.

You can find the key here:
HKEY_LOCAL_MACHINE\SYSTEM\CurrentControlSet\Control\SecurityProviders\SCHANNEL\Protocols\TLS 1.0|Server
REG_DWORD - Enabled
Value: ffffffff (decimal: 4294967295)

The disabled value is:
HKEY_LOCAL_MACHINE\SYSTEM\CurrentControlSet\Control\SecurityProviders\SCHANNEL\Protocols\TLS 1.0|Server
REG_DWORD - Enabled
Value: 0(decimal: 0)

14 March 2017

Skype Online New-CsOnlineSession - Create a shortcut for your Online Sessions

The way to connect to Skype Online according to Microsoft:

Import-Module SkypeOnlineConnector            
            
$cred = Get-Credential            
            
$CSSession = New-CsOnlineSession -Credential $cred            
            
Import-PSSession $CSSession -AllowClobber

While this works, it can be done faster:

Create a RemoteSkypeOnlineSession.ps1 file and paste the above in it and save it preferably in OneDrive.
Then on your desktop create new shortcut and point the source to the saved file in OneDrive.


Adjust the "Target" with this:
C:\Windows\System32\WindowsPowerShell\v1.0\powershell.exe -noexit -command ". 'C:\Users\YourUsername\OneDrive\PowerShell\RemotePSSession\RemoteSkypeOnlineSession.ps1'"

When the Shortcut has been edited shift right click it and select "Run as a Administrator".
Enter your credentials and the PowerShell console will load the Exchange command-lets.

When you're finished with the session don't forget to exit the session, otherwise all the Powershell session will be used and there will be none left when you try to start another session.
There are 3 sessions per Admin account, and a total of 9 sessions per tenant.

Get-Psssession | fl id,session            
            
Remove-Psssession - id id-number  

Or use:        
            
Remove-psssession -name Sessionname


27 September 2016

Skype for Business client addressbook not downloading - Force Addressbook download - Why would you?


Skype for Business client addressbook not downloading - Force Addressbook download - Why would you?


This is one of those things that happens to all of us.
The Lync or Skype for Business addressbook won't download to the local computer.

I wrote about this once before for Lync 2010 here.

After upgrading to Office 2016 you get the new collaboration/communication client as well: Skype for Business. And with that comes a version change, and i don't mean in what you see at the client i mean on the file system level.

The previous path to the Lync client profile was:
C:\Users\Username\AppData\Local\Microsoft\Office\14.0\Lync\sip_username@domain.com for Lync 2010.
C:\Users\Username\AppData\Local\Microsoft\Office\15.0\Lync\sip_username@domain.com for Lync 2013.
But now it's:
C:\Users\Username\AppData\Local\Microsoft\Office\16.0\Lync\sip_username@domain.com for Skype for Business 2016.

So you have to update you registry path accordingly.
So instead of looking for:
HKEY_LOCAL_MACHINE\SOFTWARE\Policies\Microsoft\Office\14.0\Lync\GalDownloadInitialDelay for Lync 2010.
Or HKEY_LOCAL_MACHINE\SOFTWARE\Policies\Microsoft\Office\15.0\Lync\GalDownloadInitialDelay for Lync 2013.

Go to HKEY_LOCAL_MACHINE\SOFTWARE\Policies\Microsoft\Office\16.0\Lync\GalDownloadInitialDelay for the new Skype for Business 2015 client.

Make sure the value for GalDownloadInitialDelay is set at 1 for instant GAL retrieval.

But,

Why bother with local copies of files when you can search at the source?
The one place where the GAL originates from: The Skype for Business server it self.

On the frontend server open an elevated Skype for Business Management PowerShell:
To get the current Addresbook policy:
PS C:\> Get-CsClientPolicy | select identity, addressbook*

 Identity               AddressBookAvailability
Global                 WebSearchOnlyWebSearchAndFileDownload
To set the Addressbookavailability to "WebsearchOnly":
Set-CsClientPolicy -Name Global -AddressBookAvailability "WebSearchOnly"
To see more about ClientPolicies go here.

23 September 2016

Backup local user contacts from Lync 2013 and Skype for Business 2015 with Powershell

After migrating from Lync 2010 to Skype for Business 2015 the moment came to move all the users to the new registrar pool and all the local user contacts went missing.

To avoid this from happening to you, here's what you can do.

Copy the text below into a new text file and name it "Skype4BusinessUserContactsBackup.ps1"
$fileName = (Get-Date -Format ddMMyyyy) + "-SkypeUsersContactsBackup.zip"
$Path = "\\Domain.lan\Some\path\to\some\where"
# Set limit for older than days
$limit = (Get-Date).AddDays(-365)
# Delete files older than the $limit.
Get-ChildItem -Path $path -Recurse -Force | Where-Object { !$_.PSIsContainer -and $_.CreationTime -lt $limit } | Remove-Item -Force
#(Join-Path $Path $filename)
Export-CsUserData -PoolFqdn Yourpoolname -FileName (Join-Path $Path $filename)
Short description of what this all does:
$filename, set a filename in current date and time format and add SkypeUsersContactsBackup.zip.
File name looks like this: 23092016-SkypeUsersContactsBackup.zip.
$path, specify a path where the file will be saved.
$limit, how many days before we start deleting the backup zip files.
At the end the export from the pool will be written in the destination made from $path and $filename.

Then create a scheduled task with these action settings:

Program/script: Powershell.exe -command ". 'path to your script\scriptname.ps1'"
Set it to run at a monthly schedule or more as you desire.
The file in my environment is about 16MB for roughly 1600 users.

Now when the time comes to restore some contacts for a user, several or all users, you'll need this GUI script from Anthony Caragol.
http://www.skypeadmin.com/2014/07/14/new-tool-lync-2013-backup-and-restore-tool-gui/
Download from here:
http://gallery.technet.microsoft.com/Lync-2013-Backup-and-1f3167c8
It still works on Skype for Business.

12 September 2016

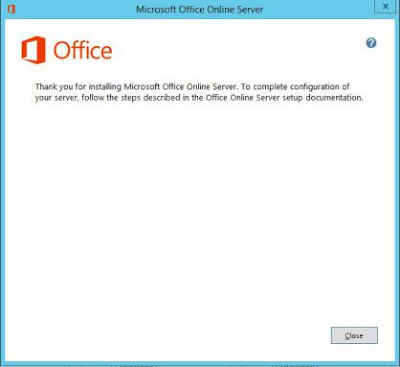
Migrate from Office Web Apps 2013 to Office Online Server 2016 for Skype for Business 2015

Sharing PowerPoint's in Skype for Business 2015 was done with Office Web Apps 2013.

Now we have Office Online Server 2016 to do this.

A few things before starting the migration:

The installation ISO can be found on the Volume License Servicing Center
Find "Office Professional Plus 2016" click "Download" select your language bit version and click "Continue", "Office Online Server x64" is listed under the Office 2016 Pro suite.
There is a serial listed, but i couldn't find where to enter it. (if you know let me know)

Prerequisites:
- .NET Framework 4.5.2
- Visual C++ Redistributable for Visual Studio 2015 (14.0.23026)

Run "Get-OfficeWebAppsFarm | FL internalurl,externalurl,certificatename" copy the output to a notepad file, you'll need this later.

Remove the Office web App Server from Skype for business, and the association within all the Skype for Business pools and publish the topology.

Uninstall "Microsoft Office Web Apps Server 2013"

Install Windows Identity Foundation 3.5 (Add Roles and Features > Features)

Install the Update for Universal C Runtime in Windows KB (https://support.microsoft.com/en-gb/kb/2999226)

Install the required features from an elevated PowerShell session:

Install-WindowsFeature Web-Server, Web-Mgmt-Tools, Web-Mgmt-Console, Web-WebServer, Web-Common-Http, Web-Default-Doc, Web-Static-Content, Web-Performance, Web-Stat-Compression, Web-Dyn-Compression, Web-Security, Web-Filtering, Web-Windows-Auth, Web-App-Dev, Web-Net-Ext45, Web-Asp-Net45, Web-ISAPI-Ext, Web-ISAPI-Filter, Web-Includes, InkandHandwritingServices, Windows-Identity-Foundation

Mount the ISO and run "Setup.exe", next, next, finish, you know the drill.


In an elevated PowerShell run:
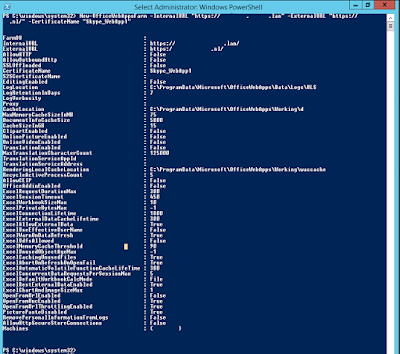
New-OfficeWebAppsFarm -InternalURL "https://oos.domain.lan" -ExternalURL "https://oos.domain.com" -CertificateName "OOS_Cert"


To be on the safe side you could reboot the server, but in this case i didn't.

Go to the Skype for Business Topology Builder with elevated privileges.
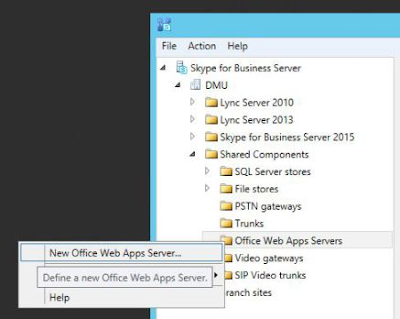
Create a new "Office Web Apps Server" in Skype for Business.


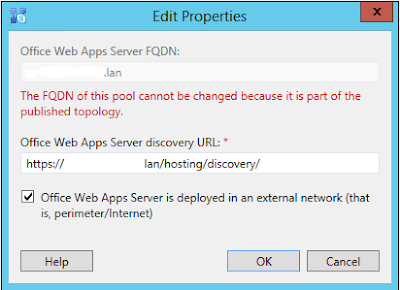
Enter the FQDN of the Office Online Server and click OK.


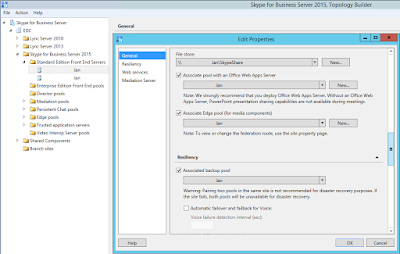
Right click each pool you would like to associate with the OOS Server, and select Edit Properties. Associate the Office Online Server with the Skype for Business pool:


Publish the topology.
A few minutes after the Topology is published, be on the lookout for event IDs 41032 & 41034 on the Skype for Business Front End Server. These confirm that the discovery of the Office Online Server has been successful.

To manually check if the Office Online Server website is running check:

Https://localhost/hosting/discovery or Https://servername/hosting/discovery

Source 1

26 January 2016

Lync/Skype addressbook cannot be downloaded

This seems to to happen very often, and rumor has it that it's a bug Microsoft hasn't addressed yet.


The addressbook can't be downloaded for some reason, and gives the above error.
There's a pretty simple way of getting rid of it according to this post by Jeff Schertz.

First check your current Global Policy settings:


The idea is to only let it do a websearch.

Create a new CLientpolicy:
New-CsClientPolicy -Identity AddressBookClientPolicy -AddressBookAvailability WebSearchOnly

The assign it to a user to test it:
Grant-CsClientPolicy -Identity Username -PolicyName AddressBookClientPolicy

To find all users that have no Clientpolicy set:
(Get-CsClientPolicy -Identity ChicagoClientPolicy).psobject.properties |? {$_.value}| select name,value

Now to see all this in action on a Lync\Skype client.
Log off from Lync\Skype.
Go to %userprofile%\appdata\Local\Microsoft\Office\16.0\Lync and delete the GALcontacts.db and GALcontacts.db.idx files.
(You may want to check other folders depending on your Lync Skype version.)
Now log back on a gain. Voila the error is gone, and all your searches go through the Address book on the server, with the big advantage of it always being the most up to date version.

11 November 2015

Skype for Business 2015, Lync 2010 and Lync 2013 IM integration into Exchange 2013 OWA

Update - 27-10-2016 - Added step 3.

We're migrating to Exchange 2013 at my company, and one of the things on my todo list was get Lync integrated into Exchange 2013 OWA.

After finding this great blog post from Oliver Moazzezi it worked at the first try.
I found this article at Technet and thought it was even more clear, especially for Skype for Business 2015.

There were a couple of things that could use some clarification so here is a little rewrite:

Exchange 2013 has two roles. The Front End proxy, and the Back End. The Back End co-locates all roles which are: Mailbox, Client Access, Hub Transport and Unified Messaging.
In Exchange 2010 you configured the IM integration entirely on the server that had the Client Access role. This could be a standalone server all co-located role server depending on the infrastructure needed. This was a config file at Exchange 2010 RTM and later moved to Powershell and settings on OWA virtual directories with SP1+.
In Exchange 2013 configuration is necessary on both the Front End and Back End roles. Again this can be co-located or standalone. I will treat them as separated for ease of understanding here.
Exchange 2013 Front Ends

1.    Perform in Powershell “Get-OWAVirtualDirectory”, you can use “Get-OWAVirtualDirectory –identity “servername\owa (default web site)” | select inst*” to immediately get the necessary information.


2. You will, if familiar with IM integration in Exchange 2010, be immediately at home here. However for IM integration in Exchange 2013 we only set two of the above four values. The values are ‘InstantMessagingEnabled’ and ‘InstantMessagingType’. We leave both ‘InstantMessagingCertificateThumbprint’ and ‘InstantMessagingServerName’ blank. This is very important as it actually does break the integration between Lync 2010 and Exchange 2013.

We can set these values with the following command:  
“Set-OwaVirtualDirectory –identity “servername\owa (default web site)” –InstantMessagingEnabled $true –InstantMessagingType OCS”
(Ignore the yellow text in my example below – I’m running the command to show you but as I’ve already set these attributes it’s telling me no settings have been modified)


3. Set the default mailbox policy to allow IM:

Set-OwaMailboxPolicy -Identity "Default" -InstantMessagingEnabled $True -InstantMessagingType "OCS"

4 . Perform the above command against ALL your Exchange 2013 Front End servers in your associated sites that need IM integration.

Exchange 2013 Back ends

5. Once this has been set we need to configure certificates. But the certificate configuration is on our Back End Exchange 2013 Servers. Browse to your Back End Servers and generate a new Certificate using New-ExchangeCertificate against the internal CA that Lync uses. I recommend this TechNet article for Cert creation: http://technet.microsoft.com/en-us/library/aa998327.aspx

Use the following two commands:
$Data = New-ExchangeCertificate –GenerateRequest –SubjectName “CN=servername.domain.lan” –DomainName “servername.domain.lan” –PrivateKeyExportable $true –FriendlyName “Easy title to see the purpose of this certififcate”

Then:

Set-Content –Path “C:\Temp\Servername.req” –Value $Data


6. Once this is done we need to complete the signing request against your internal certificate authority. I have used the web request of our SubOrdinate for this example. Use the same internal CA as what you used for SSL procurement for your Lync platform!


Save the signing request.
7. We now need to complete the signing request using Import-ExchangeCertificate. Information on this cmdlet is available here: http://technet.microsoft.com/en-us/library/bb124424.aspx


“Import-ExchangeCertificate -FileData ([Byte[]]$(Get-Content -Path ‘C:\Temp\Servername.cer’ -Encoding byte -ReadCount 0))


The certificate is now installed.
After importing the certificate you will see the thumbprint in the result screen as seen above.

--Copy this thumbprint now, you need it later in the web.config file--
Ensure you do this for all Exchange 2013 Back End Servers.
  

8. We are now in a place where all our Exchange 2013 Front End Servers have had the necessary configuration via Powershell and ‘Set-OWAVirtualDirectory’, and we have installed Certificates on all our Exchange 2013 Back End servers. We now need to edit a web config file on each Exchange 2013 Back End.The file we want to modify is the web.config file in the following location “x:\Program Files\Microsoft\Exchange Server\V15\ClientAccess\Owa”. Where x is the drive you installed too.


9.     Open the Web Config file and perform a search for “</appsettings>”. This takes you to the end of all App Settings configuration. Add these three lines in:

    <!-- Lync IM -->

    <add key="IMCertificateThumbprint" value="Enter Thumbprint here!" />
      <add key="IMServerName" value="FQDN of Lync Pool or Director Pool" />

To get the Lync FQDN Pool name:

Get-CsPool | fl fqdn
   You can see I have commented this out to explain the change I am making.


It is important to note that the thumbprint you enter in each web.config file is the thumbprint of the Certificate you have created on each Back End server.

10. Once you have performed this on all Back Ends we need to open the Lync Topology Builder and enter each Back End as a Trusted Application

Add each Exchange 2013 Back End server separately, matching the FQDN of the server and the certificate published for the Back End as the Trusted Application. Add all required Exchange 2013 Back Ends. You can also do this in a Lync PowerShell:

New-CsTrustedApplicationPool -Identity Mailboxserver.domain.com -Registrar lyncpoolname.domain.com -Site 1 -RequiresReplication $False


11.   Once created you can edit them and remove ‘Enable replication of configuration data to this pool’ as this is not needed for Lync IM integration.

12. Once all have been added Publish the Topology.
13.   We now need to open a Lync Powershell session and perform the following:

New-CsTrustedApplication –ApplicationID “Server Name” –TrustedApplicationPoolFqdn “FQDN of Exchange 2013 Back End server” –Port ‘desired port number’

Set the ApplicationID as the server name for easy reference. Set the TrustedApplicationPoolFQDN as the FQDN of the Exchange 2013 Back End you are adding. Add a port number that isn’t in use. I used 5199.


14. Once this is done ensure you repeat it for every Exchange 2013 Back End server that you need and indeed published in the Topology Builder in step 11. and 12.
15. And the last thing: Enable-CsTopology
In case it's not working as expected we may need to do the following two things to get Lync IM integration working.

The first is to recycle the MSExchangeOWAAppPool on each Exchange 2013 Back End.

This needs to be done only if IM integration is not working in OWA.

The second is to restart IIS on each Exchange 2013 Front End server.
This needs to be done only if IM integration is not working in OWA.

16. Open OWA. You should now be able to sign in and see this:


The first thing you’ll notice over Exchange 2010 OWA integration is that the contact list is not shown on the left pane anymore. You have to get it from the People Hub.


If you aren't seeing the above then you may have an OWA Mailbox Policy that isn't allowing IM. Perform in Powershell: Get-OWAMailboxPolicy to confirm against the affected users.

In the event this is the issue, use:

"Set-OWAMailboxPolicy -identity 'OWAMailboxPolicy' -InstantMessagingType OCS"