26 January 2016

Lync/Skype addressbook cannot be downloaded

This seems to to happen very often, and rumor has it that it's a bug Microsoft hasn't addressed yet.


The addressbook can't be downloaded for some reason, and gives the above error.
There's a pretty simple way of getting rid of it according to this post by Jeff Schertz.

First check your current Global Policy settings:


The idea is to only let it do a websearch.

Create a new CLientpolicy:
New-CsClientPolicy -Identity AddressBookClientPolicy -AddressBookAvailability WebSearchOnly

The assign it to a user to test it:
Grant-CsClientPolicy -Identity Username -PolicyName AddressBookClientPolicy

To find all users that have no Clientpolicy set:
(Get-CsClientPolicy -Identity ChicagoClientPolicy).psobject.properties |? {$_.value}| select name,value

Now to see all this in action on a Lync\Skype client.
Log off from Lync\Skype.
Go to %userprofile%\appdata\Local\Microsoft\Office\16.0\Lync and delete the GALcontacts.db and GALcontacts.db.idx files.
(You may want to check other folders depending on your Lync Skype version.)
Now log back on a gain. Voila the error is gone, and all your searches go through the Address book on the server, with the big advantage of it always being the most up to date version.

10 January 2016

Lync 2010 Topology builder unable to download Topology

Sound familiar?

"The term 'Get-CsTopology' is not recognized as the name of a cmdlet, function, script file, or operable program. Check the spelling of the name, or if a path was included, verify that the path is correct and try again."

It doesn't really say very clearly in the error that it can't find and thus load the Lync module, but it is what it's trying to tell you.

Copy the Lync module from:
C:\Program Files\Common Files\Microsoft Lync Server 2010\Modules\Lync

To:
C:\Windows\System32\WindowsPowerShell\v1.0\Modules\Lync

And start the Topology builder again. Now you can download the topology as you normally would.

05 January 2016

Unable to renew SubCA - 0x8007139f (WIN32: 5023)

It's the most wonderful time of the year, renewing your Issuing, Intermediate, SubCA of however you want to call it.
So the time has come to renew the Issuing certificate, well for me it has, and as always i pull out the documentation because i wanna do it correctly.
But as you all know (you have to know this) since January 1st SHA1 has been deprecated and we all should move to SHA2 (SHA256).

Obedient as i am, i moved our CA to SHA2. No problem there. But...
Now is the season to be renewing your Issuing certificate and this happens.

The following steps are to be followed:


Steps to Renew if Root CA is offline
  1. Log onto your Issuing CA and open the Certificate Authority MMC
  2. Right click on your Issuing CA > All Tasks > Renew CA Certificate
  3. Press Yes to Stop AD Certificate Services
  4. Press No to Generate a new Public/Private Pair
  5. Press Cancel and save the request some where C:\Temp for instance
Now in my case step 5 didn't happen.
Running CertUtil gave an error that was not really clear why things weren't working as expected.


After digging around for hours on fora's websites and going through my documentation over and over, it suddely hit me.
I had moved to SHA2, and the certificate i tried to renew was based on SHA1.
This would never work, so long story short. Moved to SHA2 recently? New private key in your Issuing certificate request, and follow the route to renew your Issuing certificate as you always would.

Next thing to note is that all your current certificates have to be regenerated to be compliant to the new Issuing certificate (SHA2), as for the RootCA that doesn't need to be SHA2, Trusted root certificates using SHA1 are not affected. Clients trust them for identity purposes and not for the strength of their signature algorithm.

22 December 2015

Enable Exchange 2013 Remote PowerShell over SSL

I ran in to this super clear explanation from Damian Scoles on how to configure remote PowerShell over SSL when my remote PowerShell wasn't working.

I covered the same subject once before here - remote-powershell-sessions-for-ad

This goes on step further in securing the session:

For Office365 an SSL connection to remote PowerShell is default.
$LiveCred = Get-Credential
$Session = New-PSSession -name ExchangeOnline -ConfigurationName Microsoft.Exchange -ConnectionUri https://ps.outlook.com/powershell/ -Credential $LiveCred -Authentication Basic -AllowRedirection
Import-PSSession $Session
Also note that the authentication type is BASIC.

If you try to force the PowerShell virtual directory to only accept SSL, you break local PowerShell access:
Set-PowerShellVirtualDirectory -Server ex01 -RequireSSL $true

Now that PowerShell access is broken we cannot run PowerShell commands to fix the PowerShell Virtual Directory? So switch to IIS Manager. At the PowerShell virtual directory ‘Require SSL’ is checked:


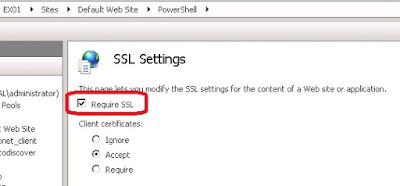
Uncheck the box and click apply.

Local Exchange PowerShell is working again.
Now how do we enable SSL remote PowerShell?
Lets make sure we can do PowerShell remoting over HTTP:

Verify it’s enabled:
Enter-PSSession -ComputerName localhost
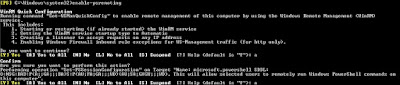
If you receive an error, then PowerShell remoting can be enabled with this command:
Enable-PSRemoting
Choose ‘A’ for the answer to the two questions:


Now that we have PowerShell enabled, verify the user account you want to connect with has access:
Get-User <alias> |ft displayname,*power*,
If the result is True, then the user has permission to connect remotely via PowerShell.

What about SSL? Let’s see what happens by default:
New-PSSession -ConfigurationName Microsoft.Exchange -ConnectionUri http://<exchange server FQDN>/PowerShell/ -Credential (Get-credential) -Authentication Kerberos
** Note ** Using Basic for Authentication method will cause the connection to fail. Either have no

Authentication defined, or choose something like kerberos in our example.

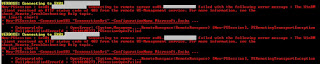
You will be prompted for credentials and allowed to connect. If however the connectionURI contains HTTPS and not HTTP, it will fail.
New-PSSession -ConfigurationName Microsoft.Exchange -ConnectionUri https://<exchange server FQDN>/PowerShell/ -Credential (Get-credential) -Authentication Kerberos

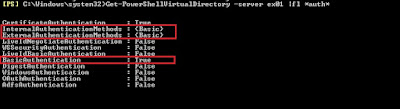
So what is the fix? IIS Authentication. The PowerShell virtual directory has no authentication settings configured
Get-PowerShellVirtualDirectory -Server <Exchange Server> | fl *auth*


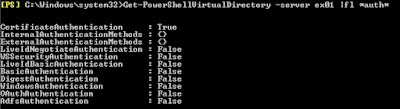
Notice that no authentication is configured by default. Let’s enable Basic Authentication as this will allow us to use an SSL connection to remotely connect via Powershell.
Get-PowerShellVirtualDirectory -Server <exchange server> | Set-PowerShellVirtualDirectory -BasicAuthentication $true

Now that we have verified PowerShell Remoting is enabled, that our user account has access and that Basic Authentication is enabled, we should be able to connect via HTTPS:


We now have a successful connection to our remote Exchange 2013 server over HTTPS.

Source

16 December 2015

Export email addresses, username and displayname from AD group to text file

Sometimes I get asked to export certain properties from AD or Exchange because I tend to do things with Powershell for ease of use.

Same goes for this request, retrieve the members from an AD group and display the username, displayname and emailaddress and export it to a file:

$groupname = "AD group name"

 Get-ADGroupmember $groupname | %{get-aduser $_.samaccountname -properties cn,samaccountname,emailaddress | select cn,samaccountname,emailaddress | Out-File c:\temp\output.txt

07 December 2015

Add Private computer and Lite version options back to OWA

When searching how to brand the OWA page with a server name, i came across this post by  Arjan Mensch.

It describes how to add the Lite OWA version and the Private computer options back in to OWA 2013 (and maybe even 2016, but i'm not able to test this).

As you may remember from Exchange 2010, there was an option to choose your privacy mode for the session:

  • This is a public or shared computer
  • This is a private computer
  • Use Outlook Web App Light


Choosing between public or shared means different timeout values for the OWA session.

To bring the public private option back to OWA run in the Exchange powerShell:
Get-OwaVirtualDirectory | Set-OwaVirtualDirectory -LogonPagePublicPrivateSelectionEnabled $true

To bring back the Light version of OWA:
Get-OwaVirtualDirectory | Set-OwaVirtualDirectory -LogonPageLightSelectionEnabled $true

To enable both the "private public" and "Lite" option for several servers in a nice onliner:
Get-OwaVirtualDirectory | Where-Object {$_.owaversion -eq "Exchange2013"} | Set-OwaVirtualDirectory -LogonPagePublicPrivateSelectionEnabled $true -LogonPageLightSelectionEnabled $true


After running these command-lets you need to restart IIS.
To do this for all servers you can run this:
$servers = "server1","server2","server3","server4","server5","server6"
foreach ($server in $servers) 
{
restart-service -servicename "w3svc"
}

Brand OWA 2013 logon page

Just like in Exchange 2007 and 2010, the Outlook web app page can be customized to your needs.

See my previous post about this here.

In my organization we use 6 multi role Exchange 2013 servers, and when logging on to OWA you can't quickly see on which server you ended up.

This can be edited fairly quickly, but keep in mind that all these changes are undone when updating the Exchange systems with a cumulative update (CU).

First you need to go to the following location:
C:\Program Files\Microsoft\Exchange Server\V15\FrontEnd\HttpProxy\owa\auth
In there you will find a file called "logon.aspx", open it in your editor of choice.

For me that's Notepad++, and on line 272 add the following line:

<p><span style="color: #FFFFFF;">SERVERNAME</span></p>

This will add your servername in white text. So if you want to see it you'll have to select the entire logon page by pressing CTRL + a, then you will see the servername.


Important Note: These edits are overwritten anytime an Exchange Server update is applied to the CAS servers.
This is because every update includes a complete reinstallation of the Exchange binaries, and the logon.aspx file you edited will be overwritten.


Typically, the logon.aspx page rarely changes, so you can usually make a copy of it after you've made your edits and copy it back after the update. However, there are no guarantees that the file will not be changed by an update. If so, you will need to re-edit the logon.aspx file.

After each installation of a cumulative update for Exchange 2013, remember to execute both the UpdateCas.ps1 and UpdateConfigFiles.ps1 Windows PowerShell scripts.
It will save you a lot of trouble, troubleshooting errors with OWA and ECP.

11 November 2015

Skype for Business 2015, Lync 2010 and Lync 2013 IM integration into Exchange 2013 OWA

Update - 27-10-2016 - Added step 3.

We're migrating to Exchange 2013 at my company, and one of the things on my todo list was get Lync integrated into Exchange 2013 OWA.

After finding this great blog post from Oliver Moazzezi it worked at the first try.
I found this article at Technet and thought it was even more clear, especially for Skype for Business 2015.

There were a couple of things that could use some clarification so here is a little rewrite:

Exchange 2013 has two roles. The Front End proxy, and the Back End. The Back End co-locates all roles which are: Mailbox, Client Access, Hub Transport and Unified Messaging.
In Exchange 2010 you configured the IM integration entirely on the server that had the Client Access role. This could be a standalone server all co-located role server depending on the infrastructure needed. This was a config file at Exchange 2010 RTM and later moved to Powershell and settings on OWA virtual directories with SP1+.
In Exchange 2013 configuration is necessary on both the Front End and Back End roles. Again this can be co-located or standalone. I will treat them as separated for ease of understanding here.
Exchange 2013 Front Ends

1.    Perform in Powershell “Get-OWAVirtualDirectory”, you can use “Get-OWAVirtualDirectory –identity “servername\owa (default web site)” | select inst*” to immediately get the necessary information.


2. You will, if familiar with IM integration in Exchange 2010, be immediately at home here. However for IM integration in Exchange 2013 we only set two of the above four values. The values are ‘InstantMessagingEnabled’ and ‘InstantMessagingType’. We leave both ‘InstantMessagingCertificateThumbprint’ and ‘InstantMessagingServerName’ blank. This is very important as it actually does break the integration between Lync 2010 and Exchange 2013.

We can set these values with the following command:  
“Set-OwaVirtualDirectory –identity “servername\owa (default web site)” –InstantMessagingEnabled $true –InstantMessagingType OCS”
(Ignore the yellow text in my example below – I’m running the command to show you but as I’ve already set these attributes it’s telling me no settings have been modified)


3. Set the default mailbox policy to allow IM:

Set-OwaMailboxPolicy -Identity "Default" -InstantMessagingEnabled $True -InstantMessagingType "OCS"

4 . Perform the above command against ALL your Exchange 2013 Front End servers in your associated sites that need IM integration.

Exchange 2013 Back ends

5. Once this has been set we need to configure certificates. But the certificate configuration is on our Back End Exchange 2013 Servers. Browse to your Back End Servers and generate a new Certificate using New-ExchangeCertificate against the internal CA that Lync uses. I recommend this TechNet article for Cert creation: http://technet.microsoft.com/en-us/library/aa998327.aspx

Use the following two commands:
$Data = New-ExchangeCertificate –GenerateRequest –SubjectName “CN=servername.domain.lan” –DomainName “servername.domain.lan” –PrivateKeyExportable $true –FriendlyName “Easy title to see the purpose of this certififcate”

Then:

Set-Content –Path “C:\Temp\Servername.req” –Value $Data


6. Once this is done we need to complete the signing request against your internal certificate authority. I have used the web request of our SubOrdinate for this example. Use the same internal CA as what you used for SSL procurement for your Lync platform!


Save the signing request.
7. We now need to complete the signing request using Import-ExchangeCertificate. Information on this cmdlet is available here: http://technet.microsoft.com/en-us/library/bb124424.aspx


“Import-ExchangeCertificate -FileData ([Byte[]]$(Get-Content -Path ‘C:\Temp\Servername.cer’ -Encoding byte -ReadCount 0))


The certificate is now installed.
After importing the certificate you will see the thumbprint in the result screen as seen above.

--Copy this thumbprint now, you need it later in the web.config file--
Ensure you do this for all Exchange 2013 Back End Servers.
  

8. We are now in a place where all our Exchange 2013 Front End Servers have had the necessary configuration via Powershell and ‘Set-OWAVirtualDirectory’, and we have installed Certificates on all our Exchange 2013 Back End servers. We now need to edit a web config file on each Exchange 2013 Back End.The file we want to modify is the web.config file in the following location “x:\Program Files\Microsoft\Exchange Server\V15\ClientAccess\Owa”. Where x is the drive you installed too.


9.     Open the Web Config file and perform a search for “</appsettings>”. This takes you to the end of all App Settings configuration. Add these three lines in:

    <!-- Lync IM -->

    <add key="IMCertificateThumbprint" value="Enter Thumbprint here!" />
      <add key="IMServerName" value="FQDN of Lync Pool or Director Pool" />

To get the Lync FQDN Pool name:

Get-CsPool | fl fqdn
   You can see I have commented this out to explain the change I am making.


It is important to note that the thumbprint you enter in each web.config file is the thumbprint of the Certificate you have created on each Back End server.

10. Once you have performed this on all Back Ends we need to open the Lync Topology Builder and enter each Back End as a Trusted Application

Add each Exchange 2013 Back End server separately, matching the FQDN of the server and the certificate published for the Back End as the Trusted Application. Add all required Exchange 2013 Back Ends. You can also do this in a Lync PowerShell:

New-CsTrustedApplicationPool -Identity Mailboxserver.domain.com -Registrar lyncpoolname.domain.com -Site 1 -RequiresReplication $False


11.   Once created you can edit them and remove ‘Enable replication of configuration data to this pool’ as this is not needed for Lync IM integration.

12. Once all have been added Publish the Topology.
13.   We now need to open a Lync Powershell session and perform the following:

New-CsTrustedApplication –ApplicationID “Server Name” –TrustedApplicationPoolFqdn “FQDN of Exchange 2013 Back End server” –Port ‘desired port number’

Set the ApplicationID as the server name for easy reference. Set the TrustedApplicationPoolFQDN as the FQDN of the Exchange 2013 Back End you are adding. Add a port number that isn’t in use. I used 5199.


14. Once this is done ensure you repeat it for every Exchange 2013 Back End server that you need and indeed published in the Topology Builder in step 11. and 12.
15. And the last thing: Enable-CsTopology
In case it's not working as expected we may need to do the following two things to get Lync IM integration working.

The first is to recycle the MSExchangeOWAAppPool on each Exchange 2013 Back End.

This needs to be done only if IM integration is not working in OWA.

The second is to restart IIS on each Exchange 2013 Front End server.
This needs to be done only if IM integration is not working in OWA.

16. Open OWA. You should now be able to sign in and see this:


The first thing you’ll notice over Exchange 2010 OWA integration is that the contact list is not shown on the left pane anymore. You have to get it from the People Hub.


If you aren't seeing the above then you may have an OWA Mailbox Policy that isn't allowing IM. Perform in Powershell: Get-OWAMailboxPolicy to confirm against the affected users.

In the event this is the issue, use:

"Set-OWAMailboxPolicy -identity 'OWAMailboxPolicy' -InstantMessagingType OCS"

29 October 2015

Move Exchange log file directories to an other drive

There are several log files in Exchange 2013 by default that help aid in diagnostics, transport troubleshooting, OWA, etc. But all these log files consume a lot of disk space, 30GB according to Microsoft.
To free up some space or to prevent your system drive from filling up and taking down your entire server, you can move some of these fairly easy to an other disk.

Stop all Exchange services to be safe:
Stop-Service MSExchangeADTopology

Get the current (default) locations for the log files:
get-TransportService sr-xxxxx | fl *logpath*

ConnectivityLogPath         : C:\Program Files\Microsoft\Exchange Server\V15\TransportRoles\Logs\Hub\Connectivity
MessageTrackingLogPath      : C:\Program Files\Microsoft\Exchange Server\V15\TransportRoles\Logs\MessageTracking
IrmLogPath                  : C:\Program Files\Microsoft\Exchange Server\V15\Logging\IRMLogs
ActiveUserStatisticsLogPath : C:\Program Files\Microsoft\Exchange Server\V15\TransportRoles\Logs\Hub\ActiveUsersStats
ServerStatisticsLogPath     : C:\Program Files\Microsoft\Exchange Server\V15\TransportRoles\Logs\Hub\ServerStats
ReceiveProtocolLogPath      : C:\Program Files\Microsoft\Exchange Server\V15\TransportRoles\Logs\Hub\ProtocolLog\SmtpRe
                              ceive
RoutingTableLogPath         : C:\Program Files\Microsoft\Exchange Server\V15\TransportRoles\Logs\Hub\Routing
SendProtocolLogPath         : C:\Program Files\Microsoft\Exchange Server\V15\TransportRoles\Logs\Hub\ProtocolLog\SmtpSe
                              nd
QueueLogPath                : C:\Program Files\Microsoft\Exchange Server\V15\TransportRoles\Logs\Hub\QueueViewer
WlmLogPath                  : C:\Program Files\Microsoft\Exchange Server\V15\TransportRoles\Logs\Hub\WLM
AgentLogPath                : C:\Program Files\Microsoft\Exchange Server\V15\TransportRoles\Logs\Hub\AgentLog
FlowControlLogPath          :
ProcessingSchedulerLogPath  :
ResourceLogPath             :
DnsLogPath                  :
JournalLogPath              : C:\Program Files\Microsoft\Exchange Server\V15\TransportRoles\Logs\JournalLog
TransportMaintenanceLogPath :
Set the log files to the new location:

Get-TransportService | foreach {
Set-TransportService -MessageTrackingLogPath “D:\Logs\MessageTracking”
Set-TransportService -ConnectivityLogPath “D:\Logs\Connectivity”
Set-TransportService -IrmLogPath “D:\Logs\IRMLogs”
Set-TransportService -ActiveUserStatisticsLogPath “D:\Logs\ActiveUserStats”
Set-TransportService -ServerStatisticsLogPath “D:\Logs\ServerStats”
Set-TransportService -ReceiveProtocolLogPath “D:\Logs\ProtocolLog\SmtpReceive”
Set-TransportService -RoutingTableLogPath “D:\Logs\Routing”
Set-TransportService -SendProtocolLogPath “D:\Logs\ProtocolLog\SmtpSend”
}

Start-Service MSExchangeADTopology
Check if the default folders are empty other wise stop the services again and move all files to the new folder and restart the services.

Install Exchange server productkey with PowerShell

This also works in Exchange 2010:
Set-ExchangeServer -Identity SR-XXXXX -ProductKey ABCDE-FGHIJ-KLMNO-PQRST-UVWXY
Or set all your servers at once: (This only works if all your Exchange server are the same version)
Get-ExchangeServer | Set-ExchangeServer -ProductKey ABCDE-FGHIJ-KLMNO-PQRST-UVWXY
After restarting the "Microsoft Exchange Information Store" the Activation will be effective. So to restart all Exchange Information Store services run:
Get-Service -Name "Microsoft Exchange Information Store" -ComputerName SR-XXXXX | Restart-Service