07 October 2016

FIXED - ANOMALY: use of REX.w is meaningless (default operand size is 64) - FIXED

UPDATE:

There is a fix for this published by Trendmicro:

https://esupport.trendmicro.com/en-us/home/pages/technical-support/1115404.aspx

=====================================================================

Came across this strange error after reinstalling my pc.


Same goes for PowerShell.


The command itself doesn't matter, the error appears at every command or applet.

Removed TrendMicro Maximum Security 2017, rebooted and the error was gone.
Installed TrendMicro Maximum Security 2017 again and there is was again.

Strange.

Then removed the TrendMicro Password manager and the TrendMicro troubleshooting tool.


Reboot, still there.
Now i can't just remove TrendMicro Maximum Security 2017 well because....
It has some thing to do with TrendMicro Maximum Security 2017 itself.

I will see if i can contact the support team and try to get this fixed or at least under the attention of TrendMicro.

To be continued.

29 September 2016

Top 30 Quick reminders for SysOps

Came across this over at gfi.com/blog, this is just here for my own quick sneak and peek.
But if you have more quick wins, tips or oneliners let me know and i'll add them.

Networking

  1. netsh int ip reset all will reset your NIC back to DHCP quickly, blanking out all static settings.
  2. net use will show you all open SMB connections on your machine.
  3. If you need to grab a quick network capture, but aren’t allowed to install Wireshark or another similar tool, open an admin command prompt and run netsh trace start capture=yes tracefile=c:\capture.etl to create a file you can open in Wireshark or Netmon later. Use netsh trace stop to end the capture.
  4. If you just need to know what is happening, but not capture a trace, use netstat as a poor man’s packet analyzer. netstat –ano 1 | findstr X will update once a second and highlight whatever you replace X with, like :443 or SYN_SENT or the destination ip.addr you are trying to confirm your machine is attempting to communicate with.
  5. netstat –e can give you a quick diagnosis of layer 2. Watch out for high or increasing numbers of errors.
  6. Grab the TCPING utility from http://www.elifulkerson.com/projects/tcping.php and use it to monitor not just when a server reboots, but when a service is back up. Try tcping –t –b 2 addr 3389 when you reboot a Windows server. It will start to use your default beep sound when the service starts responding to SYN requests, so you know you can RDP back into the box after a reboot.
  7. Use netstat –r to dump your IP routing table so you can see if everything goes to the default gateway, or somewhere unexpected.
  8. Download BIND for Windows from https://www.isc.org/downloads/# and use the Windows ports of DIG and HOST to do DNS queries.
  9. And if you like DIG and HOST, grab the whois port from https://technet.microsoft.com/en-us/sysinternals/bb897435 to do command line lookups of domain names and IP networks.

Active Directory

  1. netdom query fsmo will list all the Flexible Single Master Operations members in your domain, so you can find the PDC emulator, schema master, etc.
  2. repadmin /replsummary will give you a quick status on AD replication. It will also let you know if you cannot reach a domain controller from the machine on which you run the command.
  3. repadmin /syncall will trigger an AD replication so you don’t have to wait.
  4. net accounts will list the domain security policy.
  5. gpresult /v will dump all the Group Policy Object settings affecting you and the machine you’re on.
  6. whoami and whoami /groups will confirm your AD account and group memberships.
  7. set l will let you know what domain controller authenticated you, or if you are running with cached credentials.

Windows

  1. Use the Windows+Arrow Keys to move windows around, including both half- and quarter-monitor views.
  2. Windows+Tab to bring up a quick preview of all running applications.
  3. Windows+X brings up the Quick Access Menu.
  4. Windows+P brings up projection options for when you connect to a second monitor or projector.
  5. Windows+number will launch whatever app is in that numeric position, from left to right, on your taskbar.
  6. CTRL+SHIFT+P launches an “In Private” session of Internet Explorer.
  7. Use the Problem Steps Recorder to automatically capture screenshots of a process or procedure. It’s great for documentation and training too. Windows+R, PSR, Enter!
  8. Run powercfg –h off to turn off hibernation, and buy back several GB of disk space by dropping the hiberfil.sys file that is just taking up space on your hard drive.
  9. Look up most error codes at the command prompt by downloading the Microsoft ERR tool and saving it in your path.
  10. All the Sysinternals command-line tools can be executed from the web using \\live.sysinternals.com\tools\toolname*. Check out http://live.sysinternals.com/ for all the tools that are there.

PowerShell

  1. If you are not sure of a command, run get-command *something* to get a list of appropriate commands.
  2. Use get-help command to get help on a command. –full gives you everything, -examples just lists some examples, and –online brings up the online help.
  3. PowerShell v4 and later has copy and paste already turned on, and can use the highlight, CTRL-C, CTRL-V just like any other Windows app.
  4. There are 155 aliases in PowerShell v5, making cmdlets from DOS and Linux available to you in PowerShell. Run alias to see all the ones that are built-in, and use the alias command to create your own.

28 September 2016

Onedrive - This feature has been disabled by your administrator


How anoying, now how to get to your Onedrive?

Update - 31-10-2016 - Found another registry key to enable Onedrive if disabled by group policy.

Copy the text below and paste in a new text file, save the file as a ".reg".

Windows Registry Editor Version 5.00

[HKEY_CLASSES_ROOT\CLSID\{018D5C66-4533-4307-9B53-224DE2ED1FE6}]
"System.IsPinnedToNameSpaceTree"=dword:00000001

[HKEY_CLASSES_ROOT\Wow6432Node\CLSID\{018D5C66-4533-4307-9B53-224DE2ED1FE6}]
"System.IsPinnedToNameSpaceTree"=dword:00000001

[HKEY_LOCAL_MACHINE\SOFTWARE\Policies\Microsoft\Windows\OneDrive]
"DisableFileSyncNGSC"=dword:00000000

[HKEY_CURRENT_USER\SOFTWARE\Policies\Microsoft\office\15.0\Common\Internet]
"UseOnlineContent"=dword:00000002

[HKEY_CURRENT_USER\SOFTWARE\Policies\Microsoft\office\15.0\Common\SignIn]
"SignInOptions"=dword:00000000

[HKEY_CURRENT_USER\SOFTWARE\Policies\Microsoft\office\16.0\Common\SignIn]
"SignInOptions"=dword:00000000

[HKEY_CURRENT_USER\SOFTWARE\Policies\Microsoft\office\16.0\Common\Internet]
"UseOnlineContent"=dword:00000002

[HKEY_CURRENT_USER\SOFTWARE\SOFTWARE\Microsoft\Office\15.0\Common\Internet]
"UseOnlineContent"=dword:00000002

[HKEY_CURRENT_USER\SOFTWARE\SOFTWARE\Microsoft\Office\15.0\Common\Internet\SignIn]
"SignInOptions"=dword:00000000

[HKEY_CURRENT_USER\SOFTWARE\SOFTWARE\Microsoft\Office\16.0\Common\Internet]
"UseOnlineContent"=dword:00000002

[HKEY_CURRENT_USER\SOFTWARE\SOFTWARE\Microsoft\Office\16.0\Common\Internet\SignIn]
"SignInOptions"=dword:00000000

[HKEY_CURRENT_USER\SOFTWARE\Microsoft\Office\15.0\Common\Identity]
"UseOnlineContent"=dword:00000001

[HKEY_CURRENT_USER\SOFTWARE\Microsoft\Office\16.0\Common\Identity]
"UseOnlineContent"=dword:00000001

Then double click the reg file and close Onedrive, then reopen Onedrive and sign in from an Office application.

27 September 2016

Skype for Business client addressbook not downloading - Force Addressbook download - Why would you?


Skype for Business client addressbook not downloading - Force Addressbook download - Why would you?


This is one of those things that happens to all of us.
The Lync or Skype for Business addressbook won't download to the local computer.

I wrote about this once before for Lync 2010 here.

After upgrading to Office 2016 you get the new collaboration/communication client as well: Skype for Business. And with that comes a version change, and i don't mean in what you see at the client i mean on the file system level.

The previous path to the Lync client profile was:
C:\Users\Username\AppData\Local\Microsoft\Office\14.0\Lync\sip_username@domain.com for Lync 2010.
C:\Users\Username\AppData\Local\Microsoft\Office\15.0\Lync\sip_username@domain.com for Lync 2013.
But now it's:
C:\Users\Username\AppData\Local\Microsoft\Office\16.0\Lync\sip_username@domain.com for Skype for Business 2016.

So you have to update you registry path accordingly.
So instead of looking for:
HKEY_LOCAL_MACHINE\SOFTWARE\Policies\Microsoft\Office\14.0\Lync\GalDownloadInitialDelay for Lync 2010.
Or HKEY_LOCAL_MACHINE\SOFTWARE\Policies\Microsoft\Office\15.0\Lync\GalDownloadInitialDelay for Lync 2013.

Go to HKEY_LOCAL_MACHINE\SOFTWARE\Policies\Microsoft\Office\16.0\Lync\GalDownloadInitialDelay for the new Skype for Business 2015 client.

Make sure the value for GalDownloadInitialDelay is set at 1 for instant GAL retrieval.

But,

Why bother with local copies of files when you can search at the source?
The one place where the GAL originates from: The Skype for Business server it self.

On the frontend server open an elevated Skype for Business Management PowerShell:
To get the current Addresbook policy:
PS C:\> Get-CsClientPolicy | select identity, addressbook*

 Identity               AddressBookAvailability
Global                 WebSearchOnlyWebSearchAndFileDownload
To set the Addressbookavailability to "WebsearchOnly":
Set-CsClientPolicy -Name Global -AddressBookAvailability "WebSearchOnly"
To see more about ClientPolicies go here.

23 September 2016

Backup local user contacts from Lync 2013 and Skype for Business 2015 with Powershell

After migrating from Lync 2010 to Skype for Business 2015 the moment came to move all the users to the new registrar pool and all the local user contacts went missing.

To avoid this from happening to you, here's what you can do.

Copy the text below into a new text file and name it "Skype4BusinessUserContactsBackup.ps1"
$fileName = (Get-Date -Format ddMMyyyy) + "-SkypeUsersContactsBackup.zip"
$Path = "\\Domain.lan\Some\path\to\some\where"
# Set limit for older than days
$limit = (Get-Date).AddDays(-365)
# Delete files older than the $limit.
Get-ChildItem -Path $path -Recurse -Force | Where-Object { !$_.PSIsContainer -and $_.CreationTime -lt $limit } | Remove-Item -Force
#(Join-Path $Path $filename)
Export-CsUserData -PoolFqdn Yourpoolname -FileName (Join-Path $Path $filename)
Short description of what this all does:
$filename, set a filename in current date and time format and add SkypeUsersContactsBackup.zip.
File name looks like this: 23092016-SkypeUsersContactsBackup.zip.
$path, specify a path where the file will be saved.
$limit, how many days before we start deleting the backup zip files.
At the end the export from the pool will be written in the destination made from $path and $filename.

Then create a scheduled task with these action settings:

Program/script: Powershell.exe -command ". 'path to your script\scriptname.ps1'"
Set it to run at a monthly schedule or more as you desire.
The file in my environment is about 16MB for roughly 1600 users.

Now when the time comes to restore some contacts for a user, several or all users, you'll need this GUI script from Anthony Caragol.
http://www.skypeadmin.com/2014/07/14/new-tool-lync-2013-backup-and-restore-tool-gui/
Download from here:
http://gallery.technet.microsoft.com/Lync-2013-Backup-and-1f3167c8
It still works on Skype for Business.

12 September 2016

Migrate from Office Web Apps 2013 to Office Online Server 2016 for Skype for Business 2015

Sharing PowerPoint's in Skype for Business 2015 was done with Office Web Apps 2013.

Now we have Office Online Server 2016 to do this.

A few things before starting the migration:

The installation ISO can be found on the Volume License Servicing Center
Find "Office Professional Plus 2016" click "Download" select your language bit version and click "Continue", "Office Online Server x64" is listed under the Office 2016 Pro suite.
There is a serial listed, but i couldn't find where to enter it. (if you know let me know)

Prerequisites:
- .NET Framework 4.5.2
- Visual C++ Redistributable for Visual Studio 2015 (14.0.23026)

Run "Get-OfficeWebAppsFarm | FL internalurl,externalurl,certificatename" copy the output to a notepad file, you'll need this later.

Remove the Office web App Server from Skype for business, and the association within all the Skype for Business pools and publish the topology.

Uninstall "Microsoft Office Web Apps Server 2013"

Install Windows Identity Foundation 3.5 (Add Roles and Features > Features)

Install the Update for Universal C Runtime in Windows KB (https://support.microsoft.com/en-gb/kb/2999226)

Install the required features from an elevated PowerShell session:

Install-WindowsFeature Web-Server, Web-Mgmt-Tools, Web-Mgmt-Console, Web-WebServer, Web-Common-Http, Web-Default-Doc, Web-Static-Content, Web-Performance, Web-Stat-Compression, Web-Dyn-Compression, Web-Security, Web-Filtering, Web-Windows-Auth, Web-App-Dev, Web-Net-Ext45, Web-Asp-Net45, Web-ISAPI-Ext, Web-ISAPI-Filter, Web-Includes, InkandHandwritingServices, Windows-Identity-Foundation

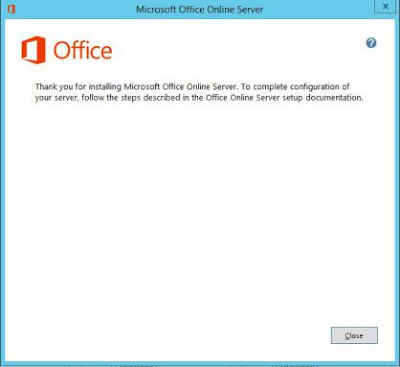
Mount the ISO and run "Setup.exe", next, next, finish, you know the drill.


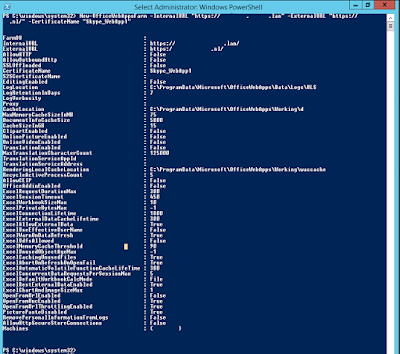
In an elevated PowerShell run:
New-OfficeWebAppsFarm -InternalURL "https://oos.domain.lan" -ExternalURL "https://oos.domain.com" -CertificateName "OOS_Cert"


To be on the safe side you could reboot the server, but in this case i didn't.

Go to the Skype for Business Topology Builder with elevated privileges.
Create a new "Office Web Apps Server" in Skype for Business.
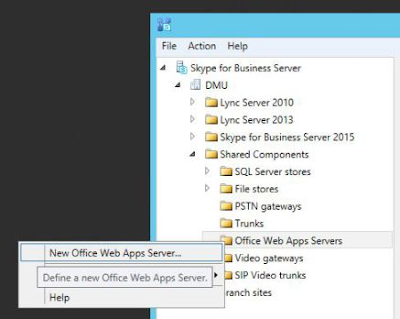


Enter the FQDN of the Office Online Server and click OK.
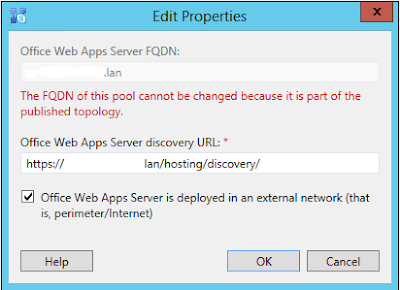


Right click each pool you would like to associate with the OOS Server, and select Edit Properties. Associate the Office Online Server with the Skype for Business pool:
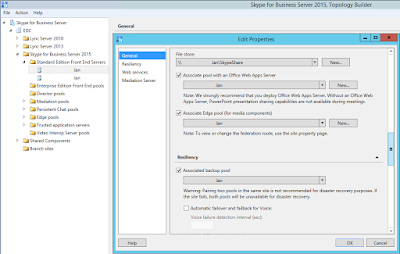


Publish the topology.
A few minutes after the Topology is published, be on the lookout for event IDs 41032 & 41034 on the Skype for Business Front End Server. These confirm that the discovery of the Office Online Server has been successful.

To manually check if the Office Online Server website is running check:

Https://localhost/hosting/discovery or Https://servername/hosting/discovery

Source 1

23 August 2016

Fastest way to create and fill (multiple) relay allowed receive connectors, and remove multiple ip addresses

UPDATE 15-09-2016


Bulk remove


After adding all the old ip addresses at once, now was the time to remove some old ip addresses from servers that we're decommissioned.

Turn's out the script below can be edited at 1 character and it does the complete opposite.
Instead of adding it removes. Look at the line number 72:
Notice the "+" sign? Change this to "-" and it removes the IP addres.
The script shows its progress at the console, but it shows "Adding" instead of "Removing".
So when cleaning up the code to represent the correct Write-Host info I ended up with this:
function get_RecConnector{

  $RecConns = Get-ReceiveConnector | Select -ExpandProperty Identity
 $Count = 0;
 Write-Host "Bulk Add of Remote IP Addresses for Exchange Receive Connectors" -ForegroundColor Green
 Write-Host "Version 0.1" -ForegroundColor Green
 Write-Host "www.telnetport25.com" -ForegroundColor Green
 Write-Host ""
 Write-Host "Detected Receive Connectors: " -ForegroundColor Cyan
 Write-Host ""
 foreach($Connector in $RecConns){
  Write-Host $Count "." $Connector -ForegroundColor White
  $Count ++
 }
 Write-Host ""
 $Choice = Read-Host "Please select the Receive Connector that you wish to work with."
 Write-Host ""
 import_RemoteIPRanges $RecConns[$Choice]
}

 function import_RemoteIPRanges{

  param($ConnectorID)
 
 $FileName = Select-FileDialog "Open IP Range Text File..."
 $IPs = Get-Content $FileName
 
  foreach($IP in $IPs){
   Write-Host "Adding IP Address :" $IP " to "$ConnectorID -ForegroundColor Cyan
        $Rcnn = Get-ReceiveConnector "$ConnectorID"
        $Rcnn.RemoteIPRanges += $IP
        Set-ReceiveConnector "$ConnectorID" -RemoteIPRanges $Rcnn.RemoteIPRanges

   }
}

 get_RecConnector
Write-Host ""
Write-Host "Script Completed." -ForegroundColor Yellow

The script uses a text file in the same way as the "Add" script, simply paste your IP addresses in a new Remove.txt file and point to it when the script runs.

Bulk Add


Had to create 6 new receive connectors on separate servers, with the email relay allowed ip addresses from an old Exchange 2010 connector.

So first export the old: (See this previous post of mine)
Get-ReceiveConnector "sr-XXXXX\smtp relay" | fl remoteipranges | 
out-file "d:\temp\smtp relay sr-XXXX.txt"

Then edit this file so that every ip address is on a single line without spaces, like so:
1.1.1.1
2.2.2.2
3.3.3.3
etc.

Now create the new send connectors, and note that on a multi role Exchange server you can't choose "Hubtransport" as connector type. If you do you'll get an error stating that there's already a connector with those exact same settings.

New-ReceiveConnector -Name "SMTP-Relay-SR-XXXXX" -Server sr-XXXXX -Usage Custom 
-Bindings 1.1.1.1:25 -RemoteIPRanges 2.2.2.2 -MaxMessageSize 30MB -TransportRole 
frontendtransport -Enabled $False
Notice the "RemoteIPRanges" value, it has to have a value so remember to edit that out after importing the old ip address range from the old connector.
Also note the "-Enabled $False" value, if the security settings are in place and the ip address import went successful and the DNS entry for the connector is in place then enable it.

Then download the "BulkImportRemoteIPonRecConn.ps1" script from Andy Grogan to import the IP addresses. The script still works on Exchange 2013, not sure on 2016.

Then run the script:

[PS] C:\_Scripts\_TEST\BulkImportRemoteIpReceiveConnector>
.\BulkImportRemoteIPonRecConn.ps1
Bulk Import of Remote IP Addresses for Exchange Receive Connectors
Version 0.1
www.telnetport25.com

 Detected Receive Connectors:

 0 . Servername\Client Servername
1 . Servername\Client Servername
2 . Servername\Default Servername
3 . Servername\Default Servername
4 . Servername\Default Servername
5 . Servername\Client Proxy Servername
6 . Servername\Default Frontend Servername
7 . Servername\Outbound Proxy Frontend Servername
8 . Servername\Client Frontend Servername
9 . Servername\XXXXX_inbound
10 . Servername\Default Servername
11 . Servername\Client Proxy Servername
12 . Servername\Client Frontend Servername
13 . Servername\XXXXX_inbound
14 . Servername\Default Servername
15 . Servername\Client Proxy Servername
16 . Servername\Default Frontend Servername
17 . Servername\Client Frontend Servername
18 . Servername\XXXXX_inbound
19 . Servername\Default Servername
20 . Servername\Client Proxy Servername
21 . Servername\Default Frontend Servername
22 . Servername\Outbound Proxy Frontend Servername
23 . Servername\Client Frontend Servername
24 . Servername\XXXXX_inbound
25 . Servername\Default Servername
26 . Servername\Client Proxy Servername
27 . Servername\Default Frontend Servername
28 . Servername\Outbound Proxy Frontend Servername
29 . Servername\Client Frontend Servername
30 . Servername\XXXXX_inbound
31 . Servername\Default Servername
32 . Servername\Client Proxy Servername
33 . Servername\Default Frontend Servername
34 . Servername\Outbound Proxy Frontend Servername
35 . Servername\Client Frontend Servername
36 . Servername\XXXXX_inbound
37 . Servername\Outbound Proxy Frontend Servername
38 . Servername\Default Frontend Servername
39 . Servername\Outbound Proxy Frontend Servername
40 . Servername\SMTP relay
41 . Servername\SMTP relay
42 . Servername\SMTP-Relay-Servername
43 . Servername\SMTP-Relay-Servername
44 . Servername\SMTP-Relay-Servername
45 . Servername\SMTP-Relay-Servername
46 . Servername\SMTP-Relay-Servername
47 . Servername\SMTP-Relay-Servername

 Please select the Receive Connector that you wish to work with.: 47

 Adding IP Address : 1.1.1.57  to  Servername\SMTP-Relay-Servername
Adding IP Address : 1.1.1.58  to  Servername\SMTP-Relay-Servername
Adding IP Address : 1.1.1.59  to  Servername\SMTP-Relay-Servername
Adding IP Address : 1.1.1.14  to  Servername\SMTP-Relay-Servername
Adding IP Address : 1.1.1.36  to  Servername\SMTP-Relay-Servername
Adding IP Address : 1.1.1.18  to  Servername\SMTP-Relay-Servername
Adding IP Address : 1.1.1.19  to  Servername\SMTP-Relay-Servername
Adding IP Address : 1.1.1.23  to  Servername\SMTP-Relay-Servername
Adding IP Address : 1.1.1.26  to  Servername\SMTP-Relay-Servername
Adding IP Address : 1.1.1.28  to  Servername\SMTP-Relay-Servername
Adding IP Address : 1.1.1.100  to  Servername\SMTP-Relay-Servername
Adding IP Address : 1.1.1.101  to  Servername\SMTP-Relay-Servername
Adding IP Address : 1.1.1.102  to  Servername\SMTP-Relay-Servername
Adding IP Address : 1.1.1.103  to  Servername\SMTP-Relay-Servername

Adding IP Address : 1.1.1.104  to  Servername\SMTP-Relay-Servername
...
...
...
Script Completed.
[PS] C:\_Scripts\_TEST\BulkImportRemoteIpReceiveConnector>

After the script completes set the security so Anonymous user access is granted. You have to do this at two places, one in PowerShell:
Get-ReceiveConnector "Servername\smtp-relay-Servername" | 
Add-ADPermission -User 'NT AUTHORITY\Anonymous Logon' 
-ExtendedRights MS-Exch-SMTP-Accept-Any-Recipient
And one in the EAC on (all) the newly created receive connectors


Your connectors are done.

12 August 2016

Change Office 2016 activation serial number

Used my activation serial one to many times, but now i need to change my invalid activation serial number in Office 2016.
This used to be quite easy by going to program and features and upon selecting Office 2013 and choosing change you could then enter a new serial number. But not anymore, why change everything with a new release?

Now in an elevated command prompt, type this:

cscript "C:\Program Files (x86)\Microsoft Office\Office16\ospp.vbs" /inpkey:XXXX-YYYYY-VVVVV-DDDDD-AAAAA

And now your Office 2016 wants to activate again over the internet, and if the serial is valid you're good to go.

28 June 2016

Exchange 2013 CU12 failed to install error 1619

This has got to be the dumbest thing I've ever come across when dealing with Microsoft products.
When installing CU12 for Exchange 2013 last night, the setup failed and was presented with this error:

Configuring Microsoft Exchange Server

Language Files COMPLETED

Restoring Services COMPLETED

Language Configuration COMPLETED

Mailbox role: Transport service COMPLETED

Client Access role: Front End Transport service COMPLETED

Mailbox role: Client Access service COMPLETED

Mailbox role: Unified Messaging service COMPLETED

Mailbox role: Mailbox service FAILED

The following error was generated when "$error.Clear();

Install-MsiPackage `

-PackagePath ([System.IO.Path]::Combine($RoleLanguagePacksPath, "Setup\ServerRoles\UnifiedMessaging\MSSpeech

_SR_TELE.ca-ES.msi")) `

-PropertyValues ("ARPSYSTEMCOMPONENT=1 ALLUSERS=1") `

-LogFile ([System.IO.Path]::Combine($RoleSetupLoggingPath, "InstallSpeech-ca-ES.msilog"))

" was run: "Microsoft.Exchange.Configuration.Tasks.TaskException: Couldn't open package 'C:\Program Files\Microsoft\Exchange Server\V15\bin\Setup\ServerRoles\UnifiedMessaging\MSSpeech_SR_TELE.ca-ES.msi'. This installation package could not be opened. Verify that the package exists and that you can access it, or contact the application vendor to verify that this is a valid Windows Installer package. Error code is 1619. ---> System.ComponentModel.Win32Exception: This installation package could not be opened. Verify that the package exists and that you can access it, or contact the application vendor to verify that this is a valid Windows Installer package

--- End of inner exception stack trace ---

at Microsoft.Exchange.Configuration.Tasks.Task.WriteError(Exception exception, ErrorCategory category, Object target,Boolean reThrow, String helpUrl)at Microsoft.Exchange.Configuration.Tasks.Task.WriteError(Exception exception, ErrorCategory category, Object target)at Microsoft.Exchange.Management.Deployment.InstallMsi.InternalBeginProcessing()at Microsoft.Exchange.Configuration.Tasks.Task.<BeginProcessing>b__5()at Microsoft.Exchange.Configuration.Tasks.Task.InvokeRetryableFunc(String funcName, Action func, Boolean terminatePipelineIfFailed)".

The Exchange Server setup operation didn't complete. More details can be found in ExchangeSetup.log located in the

<SystemDrive>:\ExchangeSetupLogs folder.

PS D:\Install\CU12>

I started the install with extracting the setup files to D:\Install\CU12, then ran the following command:
.\setup /mode:upgrade /iacceptexchangeserverlicenseterms
Looking in the exchangesetuplog file I saw that setup was looking for the missing file in this folder:
C:\Program Files\Microsoft\Exchange Server\V15\bin\Setup\ServerRoles\UnifiedMessaging\

Strange, because thats not where I extracted the setup files.
So copied the setup folder from the extracted folder:D:\Install\CU12 to C:\Program Files\Microsoft\Exchange Server\V15\bin\ to make sure the setup folder with install files where there, then started the install again from the D:\Install\CU12 folder and the everything went fine and without a glitch, I even think that it was a little bit faster. But maybe that's just wishful thinking because it was at 01:30 in the night....

According to this post from Peter de Tender I'm not the first to witness this, and sure as hell won't be the last.

22 June 2016

Installing Cumulative Updates for Exchange 2013 in production environments in combination with TrendMicro ScanMail

Installing Cumulative Updates for Exchange 2013 in production environments in combination with TrendMicro ScanMail:

1. Put the server in maintenance mode with the script on D:\Scripts\Start-ExchangeServerMaintenanceMode v1.8.ps1

- In an elevated PowerShell console : Start-ExchangeServerMaintenanceMode.ps1 -Server Servername -TargetServerFQDN servername.domain.lan
(-Server is the server that will be put in maintenance mode, -TargetServerFQDN is the server where all connections, queues etc. will be move to)

2. Stop the TrendMicro Services in the following order:

- ScanMail for Microsoft Exchange System Watcher
- ScanMail for Microsoft Exchange Remote Configuration Server
- ScanMail for Microsoft Exchange Master Service

3. Change the Startup type for the Trendmicro Services to “Disabled”

4. Check the status for the Exchange components in the Exchange PowerShell console:
- Get-ServerComponentState –Identity Servername

5. Reboot server

6. Stop the TrendMicro Service in the Task Manager under the tab "services" in the following order:
- ScanMail_RemoteConfig
- ScanMail_SystemWatcher
- Scanmail_Master

7. In an elevated PowerShell console;
- Go to the folder where the extracted CU files are, in that folder type:
- .\setup /mode:upgrade /iacceptexchangeserverlicenseterms (Attention -  make sure .\ is in front of setup)

8. After successful installation of the CU reboot the server

9. Change the startup type for the TrendMicro services “Automatic” (Except ScanMail EUQ Monitor)

10. Reboot the server

11. Stop Maintenance mode with the script on D:\Scripts\Stop-ExchangeServerMaintenanceMode v1.8.ps1

- In an elevated PowerShell console : Stop-ExchangeServerMaintenanceMode.ps1 -Server Servername

12. Check the status for the Exchange components in the Exchange PowerShell console:
- Get-ServerComponentState –Identity Servername

13. Now the server is active and will be accepting connections and the database copies will be updated