18 November 2014

Enable IMAP protocol logging

I needed to find out what mailboxes are being accessed by the IMAP protocol.

View the current settings:

Get-ImapSettings -Server sr-XXXXX | select *log*


LoginType               : PlainTextLogin
ProtocolLogEnabled      : False
LogFileLocation         : C:\Program Files\Microsoft\Exchange Server\V14\Logging\Imap4
LogFileRollOverSettings : Daily
LogPerFileSizeQuota     : 0 B (0 bytes)

Enable IMAP logging with an overwrite setting of weekly and max log file size of 500mb:

Set-ImapSettings -Server sr-XXXXX -ProtocolLogEnabled $true -LogPerFileSizeQuota 500mb -LogFileRollOverSettings weekly

View the settings are actually set:

Get-ImapSettings | fl

ProtocolName                      : IMAP4
ProtocolLogEnabled                : True
LogFileLocation                   : C:\Program Files\Microsoft\Exchange Server\V14\Logging\Imap4
LogFileRollOverSettings           : Weekly
LogPerFileSizeQuota               : 500 MB (524,288,000 bytes)

To disable IMAP protocol logging:

Set-ImapSettings -Server sr-XXXXX -ProtocolLogEnabled $false

13 November 2014

Remote Powershell sessions for AD & Exchange on Windows 7, 8 & 10

Working from a Windows 7, 8 or 10 machine without the RSAT tools?
Create a shortcut to the Active Directory and Exchange PowerShell tools.

Copy and paste in to a new text file and save as: "D:\RemoteDCSession.ps1"

$RemoteDC = "sr-XXXXX.Company.lan"
$s = new-pssession -computer $RemoteDC
Invoke-Command -session $s -script { Import-Module ActiveDirectory }
Import-PSSession -session $s -module ActiveDirectory
Create a new shortcut to Powershell and name it "RemoteDCSession".
Edit the shortcut at the Target and enter: 


C:\Windows\System32\WindowsPowerShell\v1.0\powershell.exe -noexit -command ". 'd:\remotedcsession.ps1'"


When the Shortcut has been edited, shift right click it and select "Run as a different user".
Enter your credentials and the PowerShell console will load the Active Directory command-lets.

The same goes for the Exchange PowerShell command-lets.

Copy and paste in to a new text file and save as: "D:\RemoteEXSession.ps1"

$session = New-PSSession -ConfigurationName Microsoft.Exchange -ConnectionUri "https://sr-XXXXX.Company.lan/powershell" -Authentication Kerberos or Negotiate
import-pssession $session

Create a new shortcut to Powershell and name it "RemoteEXSession".
Edit the shortcut at the Target and enter:

C:\Windows\System32\WindowsPowerShell\v1.0\powershell.exe -noexit -command ". 'd:\remoteexsession.ps1'"


When the Shortcut has been edited shift right click it and select "Run as a different user".
Enter your credentials and the PowerShell console will load the Exchange command-lets.

Don't forget to exit the session, otherwise all the Powershell session will be used and there will be none left when you try to start aother session.


Get-Psssession | fl id,session


Remove-Psssession - id <id-number>

Or


Remove-psssession -name <Sessionname>

06 November 2014

Show-Command in PowerShell 3.0 & PowerShell 4.0

Introduced in WMF 3.0 and WMF 4.0 the Show-Command commandlet, aka shcm.

Great feature for the people who keep forgetting what parameters are available.
It also gives you the option to run the selected command or to copy the command and paste it in the shell.
Jeffrey Hicks from MCPMag.com wrote a nice article about it:

Show Me State: PowerShell 3.0's Show-Command Gets GUI

PowerShell 3.0 sports a cool new feature, the Show-Command cmdlet, which provides a graphical way of looking at all cmdlets and functions at your disposal. Here's a graphic look at it.
One of the more exciting new features in PowerShell 3.0 is the Show-Command cmdlet. This tool offers a graphical interface for working with cmdlets and modules. It is a graphical tool, but you can launch it from the PowerShell prompt as well as view its help:
PS C:\> help show-command
If you run Show-Command at a prompt without specifying a command name, the graphical display will list cmdlets and functions from all modules, regardless of whether or not they are loaded into the current shell. Another new feature of PowerShell 3.0 is that you can run any command and PowerShell will dynamically load the necessary module.
In the tool you can enter a command name, or filter by selecting a module from the drop down list, as I did in Fig. 1.
Figure 1. Run Show-Command from a prompt and you'll be able to enter a command name or filter by selecting a module from a drop down list. (Click image to view larger version.)

Let's say you wanted to know more about Get-Eventlog. Click on it. Show-Command will display a form for all of its parameters, as shown in Fig. 2.

Figure 2. Here's what you need to know about Get-Eventlog, courtesy of Show-Command; each tab is a parameter set. (Click image to view larger version.)
The different tabs correspond to the different parameter sets. What I think many people will like is that you can enter in parameter values. I'll enter in a few in Fig. 3.

Figure 3. You can choose or type the parameter values you want, such as I'm doing here for Get-Eventlog.(Click image to view larger version.)
I can click the Run button and the composed command will execute in the shell. Or I can click Copy and PowerShell will generate the command expression which I can copy into the shell, the ISE or anywhere like this article:
Get-EventLog -LogName "System" -After 1/1/2012 -ComputerName "COREDC01" -EntryType "Error"
How handy is that! There is also a variation on this tool in the new Integrated Scripting Editor (ISE). It opens by default when you launch the ISE as you can see in Fig. 4.
Figure 4. Show-Command, the ISE version. (Click image to view larger version.)
It works essentially the same way. If you select a command that is in a module you haven't loaded, you'll most likely see a button to Show Details. Click it and then you'll have the same entry form as shown earlier.
Again, you can Run or Copy the command. In the ISE there is also an Insert button which should insert the command into the current script. As I write this, PowerShell v3 is still in beta and there is a bug where this doesn't work. But the intention is that you can use Show-Command to build command expressions and insert them into your script. I think this will change the way many IT pros approach PowerShell scripting.
If you'd like to try this out for yourself, grab a copy of the Windows 8 preview or the Windows Management Framework 3.0 beta from Microsoft, open up a PowerShell or ISE session and "show" away.
Note: Some of the information in this article is based on the latest publicly available pre-release version of PowerShell 3.0. Expect some changes with the final, shipping release.

05 November 2014

Fill the receive connector from text file with PowerShell

Adding multiple ip addresses to a receive connector manually is a pain in the fingers.
That's when Powershell is your best mate:

Get all receive connector names, we need the name of the connector later in our command-let.
Get-ReceiveConnector

 Identity                                        Bindings                           Enabled
--------                                          --------                               -------
SR-xxxxx\Default SR-xxxx       {:::25, 0.0.0.0:25}             True
SR-xxxxx\Client SR-xxxx         {:::587, 0.0.0.0:587}         True
SR-xxxxx\Default SR-xxxx       {:::25, 0.0.0.0:25}             True
SR-xxxxx\Client SR-xxxx         {:::587, 0.0.0.0:587}         True
SR-xxxxx\SMTP relay              {1.1.1.1:25}                       True

If you execute the command below you overwrite all the previous ip addresses:

Set-ReceiveConnector "SMTP relay" -RemoteIPRanges 10.0.0.99

To add multiple IP addresses at once use this command sequence:
$Con = Get-ReceiveConnector "SMTP relay"
$Con.RemoteIPRanges += "10.0.0.99", "10.0.0.100", "10.0.0.101"
Set-ReceiveConnector "SMTP relay" -RemoteIPRanges $Con.RemoteIPRanges

Sometimes the list of IPs being added is too long to type out. To add multiple IP addresses from a text file called C:\Temp\newips.txt use this command sequence instead:
$Con = Get-ReceiveConnector "Relay Connector"
Get-Content C:\Temp\newips.txt | foreach {$Con.RemoteIPRanges += "$_"}
Set-ReceiveConnector "Relay Connector" -RemoteIPRanges $Con.RemoteIPRanges

Source

27 October 2014

My Ketarin software repository XML file

Ketarin is a software repository tool that keeps your install sources up to date.
Not like SUMO that checks for installed software and updates for those installations.
This is for your re-installations or USB drive that you carry with you that holds all the latest
versions of your favorite tools.

http://ketarin.canneverbe.com/

From the website:

Ketarin is a small application which automatically updates setup packages. As opposed to other tools, Ketarin is not meant to keep your system up-to-date, but rather to maintain a compilation of all important setup packages which can then be burned to disc or put on a USB stick.

Basically, it monitors the content of web pages for changes and downloads files to a specified location. There is a tutorial explaining it all. Currently, you can either rely on a service based on FileHippo, or you can define your own rules, even using regular expressions (for advanced users). A similar application, for monitoring web pages, is Webmon and has sometimes served as guide.

Currently i use it for all the apps i like and need, and find it annoying to manually update everything 
once every month or so. Just run Ketarin and update all your software installer files in one go.

This is a small piece of whats in my personal list for now. (i will be updating it regularly)


Download the XML from here.

Exchange 2013 Password Reset Tool

Just like in Exchange 2010 there is a password reset tool, but it's not enabled by default.
See my previous post here.

In Exchange 2013 the same options is present by the change of a registry.

From Petri.com comes the following excellent post:

The configuration to allow users to change their expired passwords involves:
  • Setting the appropriate registry key on your Exchange 2013 CAS Servers
  • Configuring settings within IIS on your Exchange 2013 CAS Servers
  • Configuring correct password policy on AD domain level
The following example moves through these three steps in more detail. Imagine a default non-admin mailbox user whose password setting has been configured to “Change password at next logon”. This is the default setting for newly-created users in most organizations. The setting is also valid when a user’s password has expired.

1. Set appropriate registry key on the Exchange 2013 CAS Servers

This registry key is not terribly different from Exchange 2010.
1)     Open your Registry Editor (regedit.exe)
2)     Browse to the following key:
HKey_Local_MachineSystemCurrentControlSetServicesMS Exchange OWA
3)     There should be a REG_DWORD Value String of “ChangeExpiredPasswordEnabled”, and that key has a value of “1”. You can change this key manually. If the key should be active but has a value of zero (0), make sure you set it to “1”.

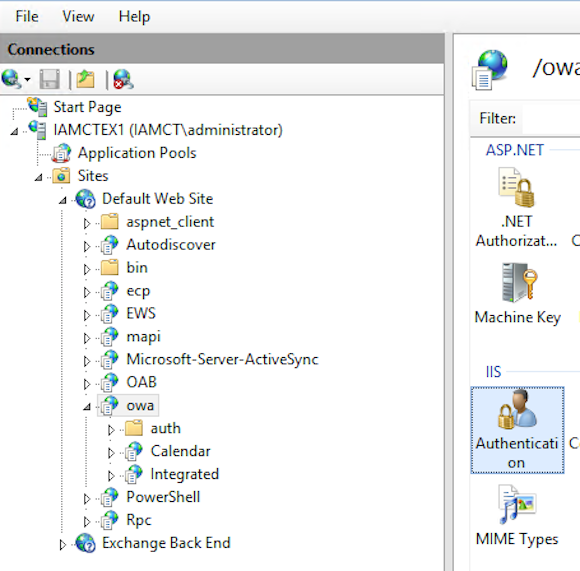
2. Configure settings in IIS on your Exchange 2013 CAS Servers

1)     On your Exchange 2013 CAS Server(s), open the IIS Admin Console.
2)     Browse to Server / Sites / Default Web Site / OWA.
3)     Select “HTTP Redirect” and open its properties.


4)     Make sure the HTTP redirect checkbox is not checked.


5)     Browse to Server / Sites / Default Web Site / OWA.
6)     Select “Authentication” and then select Basic Authentication.

7)     Right-click Edit.
8)     In the Default Domain field text field, enter a backslash – ““.

9)     Save your settings and close the IIS Admin Console.
10)  From a command prompt with Admin rights, run “IISReset /noforce” to reset the IIS services. In some scenarios the IISReset will fail, in which case you can try to manually restart the “Worldwide Web Publishing Service”. If you can’t manually restart, execute a reboot of the server as last resort.
Sponsored

3. Configure correct password policy settings at Active Directory domain level

Please note: The following settings are valid in a lab environment and updated to demonstrate the specific scenario where we want OWA to prompt a user to reset his or her password upon logon. In the lab environment this was accomplished by setting “change password at next logon.” In your environment it could be based on password expiration policy. In the lab we set it to a “zero day policy” that forces users to reset their password immediately.
1)     From a Domain Controller in your domain (or from an admin workstation with the RSAT tools installed), open the Group Policy Management Editor.

2)     Browse to Default domain policy. Right-click and select Edit. (Note: depending on your environment, it could be a best practice to create a specific GPO for the password policy settings)

3)     Next, browse to Computer Configuration / Policies / Windows Settings / Security Settings / Account Policies / Password Policy.
4)     Change the Minimum Password Age to “0”. This setting refers to the number of days a user must have used his password before it can be reset. In the lab environment we set this to zero to make it effective immediately. In your environment this policy setting could be different.

5)     Lastly, we will force our demo mailbox user to have his or her password changed. This is done via the  Active Directory Users & Computers / user account / properties / User must change password at next logon path.
Please note: Make sure that both the “user cannot change password” and “Password never expires” settings are disabled. Otherwise the change password feature in OWA won’t work.

Final Step: Test the change password feature from within the OWA logon page

1)     Open up our OWA logon page by going to https//<servername>/OWA
2)     Enter your AD mailbox user credentials.
3)     You will receive a notification that your password has expired and will be prompted to enter your old/new password.


4)     After successfully entering your new credentials, you will be informed you have to re-authenticate using the new credentials. After that, your mailbox user should have logged on to his or her OWA environment successfully.

Source

15 October 2014

Search-Mailbox delete all messages "From" and with subject "something" sent on specific date or a combination of the three

In addition to my previous post, here's how to search for a mail message from a particular sender and with a specific subject.
Get-Mailbox -ResultSize unlimited | Search-Mailbox -SearchQuery subject:
"Help-desk","Sent:28/01/2015", from:'someone@domain.com' 
-TargetMailbox administrator -LogOnly -TargetFolder CustomSearch 
This will generate a lot of output, and searching through all those lines in the Powershell console can be a pain. So i make things easy for myself and send it to myself.
$Output = Get-Mailbox -ResultSize unlimited | Search-Mailbox  
-SearchQuery subject:"Help-desk",from:'someone@domain.com'  
-TargetMailbox administrator -LogOnly -TargetFolder CustomSearch
And then;
Send-MailMessage -SmtpServer smtp.domain.com -To 
 edwin@domain.com -subject "List" -From edwin@domain.com 
 -Body ($output | out-string)
The email is much easier to search trhough.

When you checked that the search went according to plan, you can finally delete all the emails you searched for by adding: -DeleteContent and removing -LogOnly
Get-Mailbox -ResultSize unlimited | Search-Mailbox 
 -SearchQuery subject:"Help-desk",from:'someone@domain.com'  
-TargetMailbox administrator -TargetFolder CustomSearch -DeleteContent
Tip:

You can also search for an entire domain by specifying: from:'@domain.com'.
Note that there is no * (wildcard) in front of the @ sign.

If you want to delete a message with the subject: Re:Help-desk you should use single quote's " ' " (marked in red). Using single quotes wille delete any subject that contains Help-desk, so Re:Help-desk would be deleted as well.

Example: 'Re:Help-desk'

If you want to delete only the subject: Help-desk you should use the double quote's " " "

Example: "Re:Help-desk"


Full description of the Search-Mailbox command let can be found here


Tony Redmond just posted a more in depth view on this subject, go check it out here.


14 October 2014

Add Search-Mailbox Role permissions

To use the Search-Mailbox command let you have to assign permissions to your account first.
In Exchange 2010 none of the preloaded role groups have the Mailbox Import Export role, The person performing the import or export must have the appropriate permissions within Exchange. The easiest way to grant this permission is by adding  Mailbox Import Export role to a role group.


Exchange Server 2010 comes with Roll-based Administration; you will need to run the following commands first though:

To create the role group we need to run the following:

New-RoleGroup "Mailbox Import-Export Management" -Roles "Mailbox Import Export"

This will create a group called “"Mailbox Import-Export Management"”, every user added to this group will have the right to run the import/export cmdlets, adding a user can be done by running the following:

Add-RoleGroupMember "Mailbox Import-Export Management" -Member <user account>

Or:


New-ManagementRoleAssignment –Role “Mailbox Import Export” –User “<username>”

This command gives the user permission to import and export mailboxes. Another way of doing this is creating an Active Directory group and adding permissions to this group using the following command:


New-ManagementRoleAssignment –Role “Mailbox Import Export” –Group “<usergroup>”


06 October 2014

Windows 8 and the missing Wifi profile manager

Never missed it until i needed it just now.
In Windows 7 there's a wifi profile manager.


Here you can edit your wifi connections, even those your currently not connected to.


In windows 8 its gone....

Now you must use Netsh from the windows 8(.1) CLI (cmd).
Open a run box window (or press win+R) then type cmd to open Windows 8 CLI.
To see stored wireless profiles, type:
   netsh wlan show profiles
This will show a list of saved profiles of your connected WLAN devices. Then you'll need to write/save/memorize the profile name that you want to change.
To see the stored key (WPA/WEP/etc) of a specific profile:
   netsh wlan show profiles name=[profile name] key=clear
You'll find the key content under security settings.
To delete a stored profile:
   netsh wlan delete profile name=[profile name]
This will delete the stored profile of every WLAN interface. If you want to delete the profile of a specific WLAN interface, you need to use the following:
   netsh wlan delete profile name=[profile name] interface=[interface name]
Or you can use an open source tool called: WiFi Profile Manager 8.
This tool lets you view all connections ever made in an easy to use GUI.
Go to the website for more info.

Export Lync 2010 Archived Conversation Logs

Find your database instance name:

Get-CsConfigurationStoreLocation

Gives back:


server or clustername\DBInstanceName

Export all logs from a specified date for a specified user to a speciefied path:

Export-CsArchivingData -DBInstance "clustername\DBInstanceName" -StartDate 1/1/2014 -OutputFolder c:\temp\export -UserUri "sip:username@domain.com"

Export all logs from a specified date for everyone:

Export-CsArchivingData -DBInstance "clustername\DBInstanceName" -StartDate 1/1/2014 -OutputFolder c:\temp\export

There seems to be an issue with the -UserUri command, if you enter the full sipname then the command fails, so be sure to enter the username or alias.